

목차
프로젝트 구성 및 의존성 추가
dependency 추가
1.
Maven project - pom.xml
<dependency>
<groupId>org.springframework.boot</groupId>
<artifactId>spring-boot-starter-security</artifactId>
</dependency>
XML
복사
2.
Gradle project - build.gradle
implementation 'org.springframework.boot:spring-boot-starter-security'
XML
복사
스프링 시큐리티의 의존성 추가 시 일어나는 일들
•
서버가 기동되면 스프링 시큐리티의 초기화 작업 및 보안 설정이 이뤄진다.
•
별도의 설정이나 구현을 하지 않아도 기본적인 웹 보안 기능이 현재 시스템에 연동
1.
모든 요청은 인증이 되어야 자원에 접근이 가능하다.
2.
인증 방식은 폼 로그인 방식과 httpBasic로그인 방식을 제공한다.
3.
기본 로그인 페이지 제공

4.
기본 계정 한 개 제공 user/랜덤문자열

참고: 개발도중 매번 생성되는 랜덤문자열/계정으로 로그인하는것은 까다롭다.
application.properties에 기본 name/password설정이 가능하다.
spring.security.user.name=user
spring.security.user.password=1234
Java
복사
문제점
•
계정 추가, 권한 추가, DB 연동 등
•
기본적인 보안 기능 외에 시스템에서 필요로 하는 더 세부적이고 추가적인 보안기능 필요.
사용자 정의 보안 기능 구현
스프링 시큐리티의 웹 보안 기능 초기화 및 설정
:WebSecurityConfigurerAdapter
•
Security Dependency를 추가한 이후 기본적인 security를 설정및 구현하는 클래스
•
•
SecurityConfig 설정 클래스를 만들어 인증&인가 API를 만들어서 보안성을 높힐 수 있다.
SecurityConfig 설정
@Configuration
@EnableWebSecurity //웹보안 활성화를위한 annotation
public class SecurityConfig extends WebSecurityConfigurerAdapter {
@Override
protected void configure(HttpSecurity http) throws Exception {
http
.authorizeRequests() // 요청에 의한 보안검사 시작
.anyRequest().authenticated() //어떤 요청에도 보안검사를 한다.
.and()
.formLogin();//보안 검증은 formLogin방식으로 하겠다.
}
}
Java
복사
•
@EnableWebSecurity 애노테이션을 WebSecurityconfigurerAdapter 를 상속하는 설정 객체에 붙혀주면 SpringSecurityFilterChain에 등록된다.
 참고: @EnableWebMvcSecurity
스프링 MVC에서 웹 보안을 활성화하기 위한 애너테이션으로 핸들러 메소드에서 @AuthenticationPrincipal 애노테이션이 붙은 매개변수를 이용해 인증처리를 수행한다. 그리고 자동으로 CSRF 토큰을 스프링의 form binding tag library를 사용해 추가하는 빈을 설정한다.
Form Login인증
Login Flow
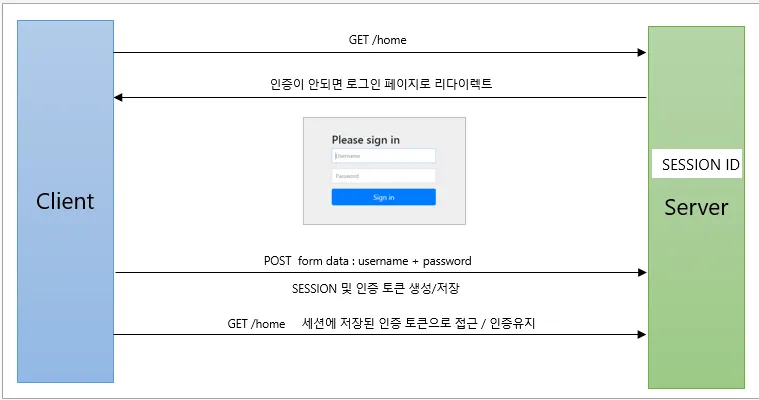
1.
Client에서 Get방식으로 Home Url자원접근 요청
2.
Server에서는 인증된 사용자만 접근가능하다고 판단해 인증이 안되면 로그인 페이지로 리다이렉트
3.
Client는 로그인페이지의 username/password 입력하여 Post방식으로 인증 시도
4.
Server에서는 Session ID생성후 인증결과를 담은 인증 토큰(Authentication) 생성 및 저장
5.
Client에서 /home 접근요청 시 세션에 저장된 인증 토큰으로 접근및 인증 유지
Security Config 설정
@Configuration
@EnableWebSecurity
public class SecurityConfig extends WebSecurityConfigurerAdapter {
@Override
protected void configure(HttpSecurity http) throws Exception {
http
.authorizeRequests()
.anyRequest().authenticated()
.and()
.formLogin()//Form 로그인 인증 기능이 작동함
.loginPage("/login.html")//사용자 정의 로그인 페이지
.defaultSuccessUrl("/home")//로그인 성공 후 이동 페이지
.failureUrl("/login.html?error=true")// 로그인 실패 후 이동 페이지
.usernameParameter("username")//아이디 파라미터명 설정
.passwordParameter("password")//패스워드 파라미터명 설정
.loginProcessingUrl("/login")//로그인 Form Action Url
.successHandler(loginSuccessHandler())//로그인 성공 후 핸들러 (해당 핸들러를 생성하여 핸들링 해준다.)
.failureHandler(loginFailureHandler());//로그인 실패 후 핸들러 (해당 핸들러를 생성하여 핸들링 해준다.)
.permitAll(); //사용자 정의 로그인 페이지 접근 권한 승인
}
}
Java
복사
•
loginSuccessHandler()/loginFailureHandler()는 내부에서 익명클래스로 선언해주는 방법도 있다.
.successHandler(new AuthenticationSuccessHandler() {
@Override
public void onAuthenticationSuccess(HttpServletRequest httpServletRequest,
HttpServletResponse response,
Authentication authentication) throws IOException, ServletException {
System.out.println("authentication:: "+ authentication.getName());
response.sendRedirect("/");
}
})//로그인 성공 후 핸들러
.failureHandler(new AuthenticationFailureHandler() {
@Override
public void onAuthenticationFailure(HttpServletRequest httpServletRequest,
HttpServletResponse response,
AuthenticationException e) throws IOException, ServletException {
System.out.println("exception:: "+e.getMessage());
response.sendRedirect("/login");
}
})//로그인 실패 후 핸들러
Java
복사
Form Login 인증 필터:
UsernamePasswordAuthenticationFilter
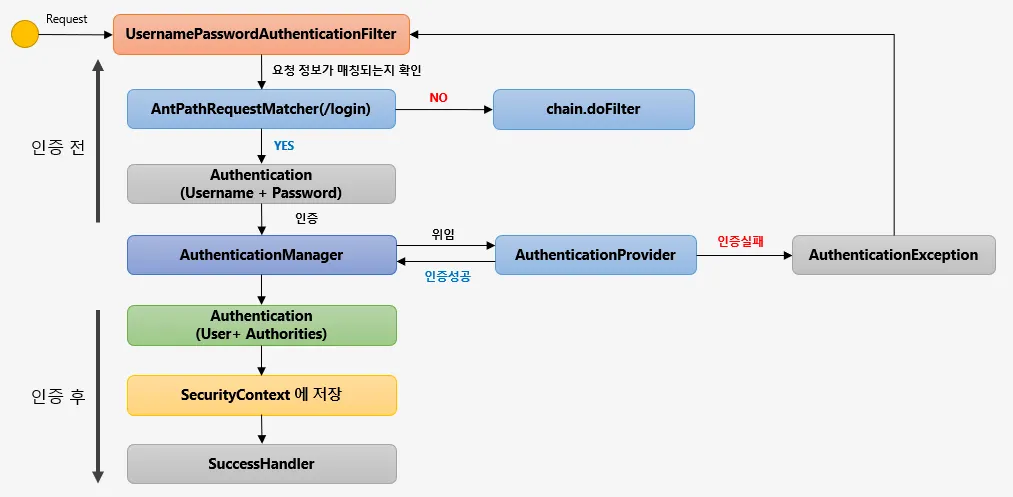
Login Form 인증 로직 플로우
1.
UsernamePasswordAuthenticationFilter
•
로그인 인증처리를 담당하고 인증처리에 관련된 요청을 처리하는 필터
UsernamePasswordAuthenticationFilter - Logic
1.
AntPathRequestmatcher(/login)
→ 사용자가 요청한 요청정보를 확인하여 요청정보 Url이 /login으로 시작하는지 확인한다.
요청한다면 다음단계로(인증처리) 진행되고, 일치하지 않는다면 다음 필터로 진행된다.(chain.doFilter)
/login url은 .loginProcessingUrl()으로 변경 가능하다.
/login url은 .loginProcessingUrl()으로 변경 가능하다.
2.
Authentication 에서 실제 인증처리를 하게 되는데, 로그인 페이지에서 입력한 Username과 Password를 인증객체(Authentication)에 저장해서 인증처리(AuthenticationManager)를 맡기는 역할을 한다.
→ 여기까지가 인증처리를 하기전에 필터가 하는 역할.
3.
인증관리자(AuthenticationManager)는 내부적으로 AuthenticationProvider 에게 인증처리를 위임하게 된다. 해당 Provider가 인증처리를 담당하는 클래스로써 인증에 성공/실패를 반환하는데 실패할 경우 AuthenticationException 예외를 반환하여 UsernamePasswordAuthenticationFilter로 돌아가서 예외처리를 수행하고, 인증에 성공하게 되면, Authentication 객체를 생성하여
User객체와 Authorities객체를 담아서 AuthenticationManager에게 반환한다.
4.
AuthenticationManager는 Provider로부터 반환받은 인증객체(인증결과 유저(User), 유저권한정보(Authorities))를 SecurityContext객체에 저장한다.
5.
SecurityContext는 Session에도 저장되어 전역적으로 SecurityContext를 참조할 수 있다.
6.
인증 성공 이후에는 SuccessHandler에서 인증 성공이후의 로직을 수행하게 된다.
정리
: 인증처리 필터(UsernamePasswordAuthenticationFilter)는 Form인증처리를 하는 필터로써 해당 필터는 크게 두가지로 인증전과 인증후의 작업들을 관리한다.
인증처리전에는 사용자 인증정보를 담아서 전달하면서 인증처리를 맡기고(AuthenticationManager) 성공한 인증객체를 반환받아서 (전역적으로 인증객체를 참조할 수 있도록 설계 된)SecurityContext에 저장하고, 그 이후 SuccessHandler를 통해 인증 성공후의 후속 작업들을 처리합니다.
Login Form 인증 로직 플로우 - 코드
1.
LoginPage에서 Username / Password 입력후 로그인 시도
2.
AbstractAuthenticationProcessingFilter의 doFilter 체크AbstractAuthenticationProcessingFilter.java
public void doFilter(ServletRequest req, ServletResponse res, FilterChain chain)
throws IOException, ServletException {
...
//requiresAuthentication 이 true가 되어 통과된다.
if (!requiresAuthentication(request, response)) {
chain.doFilter(request, response);
return;
}
...
}
Java
복사
3.
AbstractAuthenticationProcessingFilter의 doFilter 내의 attempAuthentication 시도
public void doFilter(ServletRequest req, ServletResponse res, FilterChain chain)
throws IOException, ServletException {
...
Authentication authResult;
try {
// attemptAuthentication()에서 인증 시도
authResult = attemptAuthentication(request, response);
if (authResult == null) {
// return immediately as subclass has indicated that it hasn't completed
// authentication
return;
}
sessionStrategy.onAuthentication(authResult, request, response);
}
catch (InternalAuthenticationServiceException failed) {
logger.error(
"An internal error occurred while trying to authenticate the user.",
failed);
unsuccessfulAuthentication(request, response, failed);
return;
}
catch (AuthenticationException failed) {
// Authentication failed
unsuccessfulAuthentication(request, response, failed);
return;
}
...
}
Java
복사
attempAuthentication()에서 인증 시도
4.
attempAuthentication()에서 인증 시도 - AbstractAuthenticationProcessingFilter.java
//AbstractAuthenticationProcessingFilter.java
...
public Authentication attemptAuthentication(HttpServletRequest request,
HttpServletResponse response)
throws AuthenticationException {
if (postOnly && !request.getMethod().equals("POST")) {
throw new AuthenticationServiceException(
"Authentication method not supported: " + request.getMethod());
}
String username = obtainUsername(request);//username 추출
String password = obtainPassword(request);//password 추출
if (username == null) {
username = "";
}
if (password == null) {
password = "";
}
username = username.trim();
UsernamePasswordAuthenticationToken authRequest =
new UsernamePasswordAuthenticationToken(username, password);
// Allow subclasses to set the "details" property
setDetails(request, authRequest);
//AuthenticationManager 에게 인증객체 반환
return this.getAuthenticationManager().authenticate(authRequest);
}
...
Java
복사
•
username, password를 추출해서 인증객체를 생성한다.
•
그 후 AuthenticationManager에 인증객체를 반환한다.
5.
AuthenticationManager는 AuthenticationProvider 에게 인증객체를 위임한다 - ProviderManager.java
: ProviderManager(AuthenticationManager의 구현체)에서 내부적으로 AuthenticationProvider 타입의 객체들을 보관하고 있다.
public Authentication authenticate(Authentication authentication)
throws AuthenticationException {
...
//Provider중 Form인증 방식을 처리할 provider를 찾는다.
for (AuthenticationProvider provider : getProviders()) {
if (!provider.supports(toTest)) {
continue;
}
if (debug) {
logger.debug("Authentication attempt using "
+ provider.getClass().getName());
}
try {
//provider를 찾으면 여기서 실질적으로 인증처리를 위임한다.
result = provider.authenticate(authentication);
if (result != null) {
copyDetails(authentication, result);
break;
}
}
catch (AccountStatusException | InternalAuthenticationServiceException e) {
prepareException(e, authentication);
// SEC-546: Avoid polling additional providers if auth failure is due to
// invalid account status
throw e;
} catch (AuthenticationException e) {
lastException = e;
}
}
Java
복사
•
책임 사슬 패턴(Chain of Responsibility)를 이용해 적절한 Provider를 찾아 인증 책임을 위임한다.
Logout처리, LogoutFilter
Logout API
•
Flow Diagram
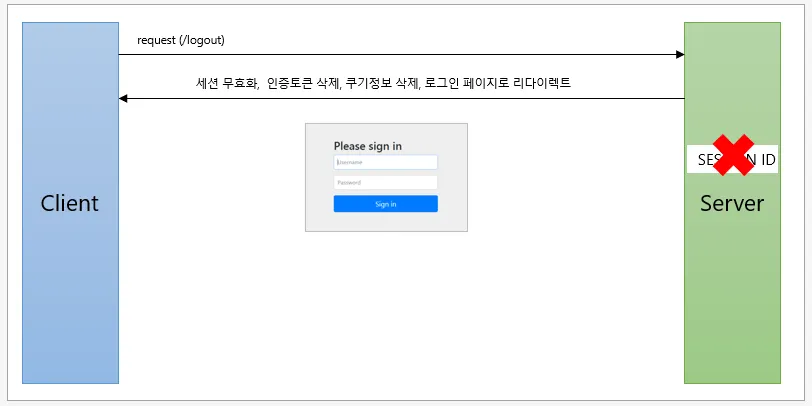
1.
Client에서 GET방식의 /logout 리소스 호출
2.
Server에서 세션무효화, 인증토큰 삭제, 쿠키정보 삭제 후 로그인페이지로 리다이렉트
•
Logout Flow Detail
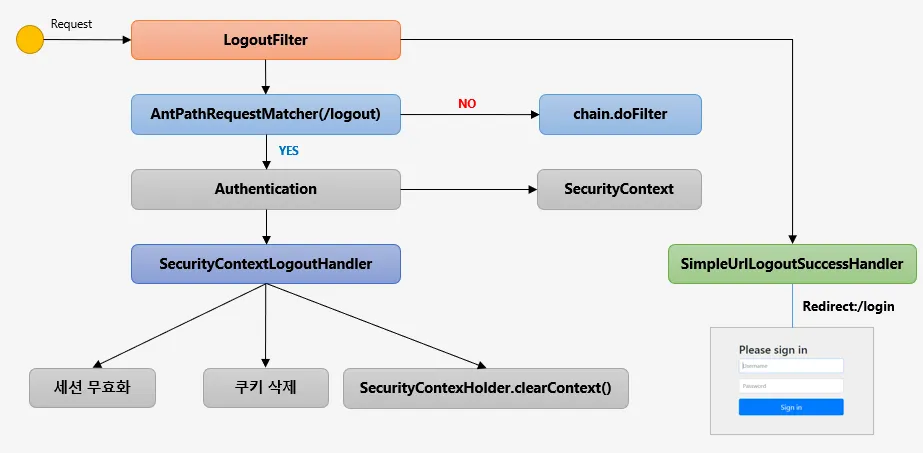
1.
요청이 Logout Url 인지 확인
2.
맞을 경우 SecurityContext에서 인증객체(Authentication)객체를 꺼내옴
3.
SecurityContextLogoutHandler에서 세션 무효화, 쿠키삭제, clearContext()를통해 SecurityContext객체를 삭제하고 인증객체도 null로 만든다.
4.
SimpleUrlLogoutSuccessHandler를 통해 로그인페이지로 리다이렉트 시킨다.
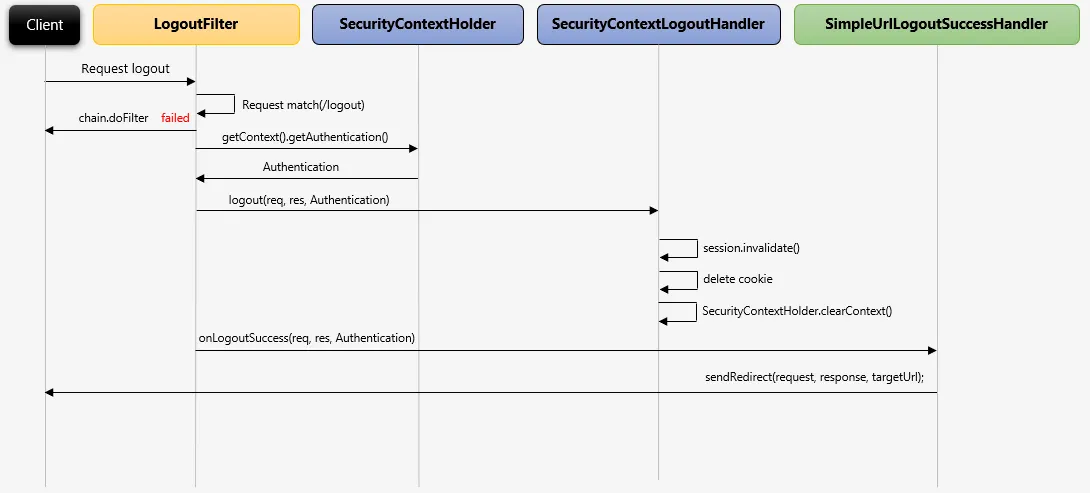
•
Logout sequence diagram
•
Logout setting code
@Configuration
@EnableWebSecurity
public class SecurityConfig extends WebSecurityConfigurerAdapter {
@Override
protected void configure(HttpSecurity http) throws Exception {
http
.logout()//로그아웃 처리
.logoutUrl("/logout")// 로그아웃 처리 URL
.logoutSuccessUrl("/login")//로그아웃 성공 후 이동페이지
.deleteCookies("JSESSIONID","remember-me")//로그아웃 후 쿠키 삭제
.addLogoutHandler(new LogoutHandler() {
@Override
public void logout(HttpServletRequest request,
HttpServletResponse response,
Authentication authentication) {
HttpSession session = request.getSession();
session.invalidate();
}
})//로그아웃 핸들러
.logoutSuccessHandler(new LogoutSuccessHandler() {
@Override
public void onLogoutSuccess(HttpServletRequest request,
HttpServletResponse response,
Authentication authentication) throws IOException, ServletException {
response.sendRedirect("/login");
}
})//로그아웃 성공 후 핸들러
.deleteCookies("remember-me");//쿠키 삭제
}
Java
복사
Remember Me 인증
개요
→ 세션이 만료되고 웹 브라우저가 종료된 후에도 어플리케이션이 사용자를 기억하는 기능
→ Remember-Me 쿠키에 대한 HTTP 요청을 확인한 후 토큰 기반 인증을 사용해 유효성을 검사하고 토큰이 검증되면 사용자는 로그인 된다.
→ 사용자 라이프 사이클
•
인증 성공(Remember-Me 쿠키 설정)
•
인증 실패(쿠키가 존재하면 쿠키 무효화)
•
로그아웃(쿠키가 존재하면 쿠키 무효화)
설정
@Configuration
@EnableWebSecurity
public class SecurityConfig extends WebSecurityConfigurerAdapter {
@Autowired
UserDetailsService userDetailsService;
@Override
protected void configure(HttpSecurity http) throws Exception {
http
.rememberMe()//rememberMe기능 작동
.rememberMeParameter("remember-me") //기본 파라미터명은 remember-me
.tokenValiditySeconds(3600)//default는 14일
.alwaysRemember(true)//remember me 기능이 활성화되지 않아도 항상 실행. default false
.userDetailsService(userDetailsService);//Remember me에서 시스템에 있는 사용자 계정을 조회할때 사용할 클래스
}
}
Java
복사
특징
•
SessionID 쿠키를 삭제하더라도 Remember-Me가 있다면 해당 쿠키를 decoding한 다음 로그인 상태를 유지할 수 있도록 한다.
Remember Me 인증 필터:
RememberMeAuthenticationFilter
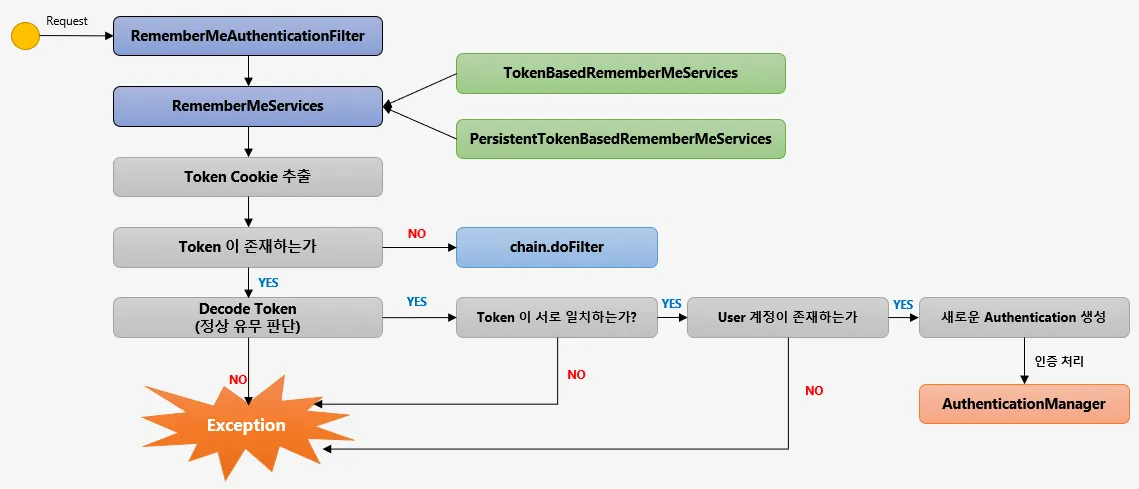
Remember Me 인증 Flow
1.
Client에서 요청 (세션이 만료되었고, 사용자는 Form인증 받을 당시 Remember me를 사용하였기에 Remember me cookie를 가지고 있음)
2.
RememberMeAuthenticationFilter 가 동작
3.
RememberMeService interface의 구현체 동작
•
TokenBasedRememberMeService → 메모리에서 저장한 토큰과 사용자가 가져온 토큰을 비교(default 14일 보존)하는 구현체
•
PersistentTokenBasedRememberMeService → DB에 발급한 토큰과 사용자가 가져온 토큰을 비교해서 인증 처리 하는 구현체
4.
Token Cookie 추출
5.
Token이 존재하는지 검사 → 만약 없다면 다음 필터 동작
6.
Decode Token으로 Token의 format이 규칙에 맞는지 판단(유효성 검사)
→ 유효성이 invalidate 하다면 Exception 발생
7.
토큰이 서로 일치하는지 검사
→ 토큰이 일치하지 않을경우 Exception 발생
8.
토큰에 User 계정이 존재하는지 검사
→ 없을 경우 Exception 발생
9.
새로운 Authentication Object를 생성하여 인증처리
10.
AuthenticationManager 인증관리자에게 전달하여 인증처리 수행
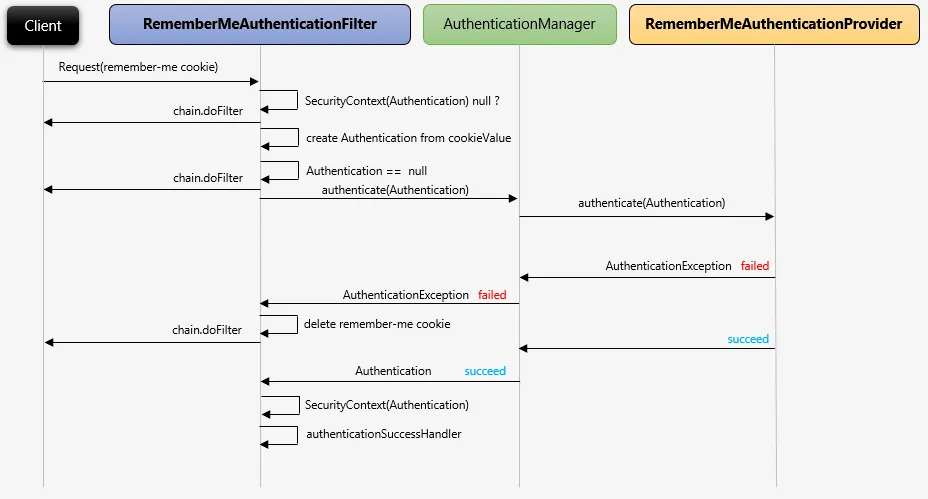
Remember Me 인증 Sequence Diagram
익명사용자 인증 필터:
AnonymousAuthenticationFilter

개요
•
인증객체가 없는 익명의 사용자를 위한 필터로써 특정 자원(페이지)에 접근시도시 인증객체를 검사하는데 만약 session을 발급받은 인증객체가 있는 사용자일 경우 해당 객체를 가지고 다음 필터를 동작하지만, 인증객체가 없을경우 익명사용자용 인증객체를 생성하기위해 사용되고 있다.
•
isAnonymous()와 isAuthenticated()를 통해 인증 여부를 검사할 수 있다( return boolean type)
•
인증객체를 세션에 저장하지 않는다.
정리
: 익명사용자와 일반 사용자간의 구분이 필요하다는 점과 , 익명사용자일 경우에 처리 로직을 동작시키기 위해 익명사용자 인증 필터와 익명사용자용 인증객체가 필요하다.
동시 세션 제어, 세션 고정 보호, 세션 정책
개요
A 컴퓨터에서 로그인하여 서비스를 사용하다가 핸드폰 혹은 다른 컴퓨터 등에서 같은 서비스를 이용하기위해 로그인을 시도할 수 있다. 그런데 이런 다중 접속시도가 무한정 허용 될 경우 여러 문제점을 야기시킬 수 있다. 교육플랫폼같은 경우에는 다중 로그인을 허용해 동시 접속이 된다면, 한 명이 강의를 결제한 뒤 모두가 공유해서 보는 문제가 발생할 수 있다.
OTT 서비스인 Wave의 경우에도 다중 접속의 경우 인원제한을 두고 과금 모델을 만들어서 제한적인 동시 세션을 허용해주고 있다. 스프링 시큐리티에서는 이런 세션에 대한 관리기능도 다음과 같이 제공을 해 주고 있다.
1.
세션관리 → 인증 시 사용자의 세션정보를 등록, 조회, 삭제 등의 세션 이력을 관리
2.
동시적 세션 제어 → 동일 계정으로 접속이 허용되는 최대 세션수를 제한
3.
세션 고정 보호 → 인증 할 때마다 세션 쿠키를 새로 발급하여 공격자의 쿠키 조작을 방지
4.
세션 생성 정책 → Always, if_required, Never, Stateless
동시 세션 제어
동시 세션 제어란 같은 계정(세션)을 동시에 몇개까지 유지할 수 있게 할 지에 대한 제어를 의미하는데,
위에서도 언급했듯이 기존 접속해있는 계정이 있다고 할 때 새로운 사용자가 동일한 계정으로 접속을 시도했을 때 어떻게 대응할지에 대한 방법으로 기존 사용자를 로그아웃 시키거나 현재 사용자가 접속을 할 수 없게 막거나 하는식이다.
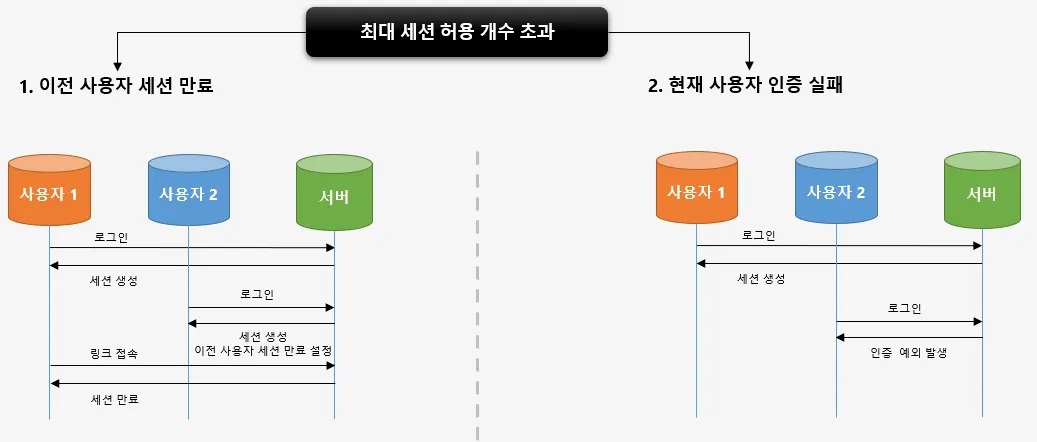
최대 세션 허용 개수를 초과하였을 경우의 처리 로직 2가지 전략
1.
이전 사용자 세션 만료 전략
→신규 로그인시 기존 로그인 계정의 세션이 만료되도록 설정하여 기존 사용자가 자원 접근시 세션만료가 된다.
2.
현재 사용자 인증 실패 전략
→ 신규 사용자가 로그인 시도시 인증 예외 발생
동시 세션 제어 설정하기
시큐리티 설정 클래스에는 다음과 같이 세션관리에 대한 옵션을 설정할 수 있다.
@Configuration
@EnableWebSecurity
public class SecurityConfig extends WebSecurityConfigurerAdapter {
@Autowired
UserDetailsService userDetailsService;
@Override
protected void configure(HttpSecurity http) throws Exception {
http
.sessionManagement() //세션 관리 기능이 작동함
.invalidSessionUrl("/invalid")//세션이 유효하지 않을 때 이동 할 페이지
.maximumSessions(1)//최대 허용 가능 세션 수, (-1: 무제한)
.maxSessionsPreventsLogin(true)//동시 로그인 차단함, false: 기존 세션 만료(default)
.expiredUrl("/expired");//세션이 만료된 경우 이동할 페이지
}
}
Java
복사
세션 고정 보호
보호라는 말은 공격으로부터 막는다는 의미로, 악의적인 해커의 세션 고정 공격을 막기위한 대응 전략이다.
세션 고정 공격 방법
개요
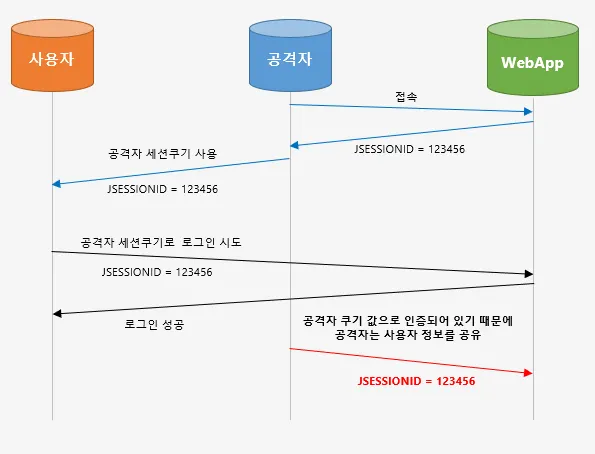
:세션 고정 공격을 방지하기 위해 세션 고정 보호가 필요하다
참고: 세션 고정 공격이란? 공격자가 서버에 접속을해서 JSSEIONID를 발급받아서 사용자에게 자신이 발급받은 세션쿠키를 심어놓게되면 사용자가 세션쿠키로 로그인 시도했을 경우 공격자는 같은 쿠키값으로 인증되어 있기 때문에 공격자는 사용자 정보를 공유하게 된다.
참고: 세션 고정 보호란?사용자가 공격자 세션쿠키로 로그인을 시도하더라도 로그인시마다 새로운 세션ID를 발급하여 제공하게 되면, JSSEIONID가 다르기 때문에, 공격자는 같은 쿠키값으로 사용자 정보를 공유받을 수 없다.
세션 고정 보호 설정하기
@Configuration
@EnableWebSecurity
public class SecurityConfig extends WebSecurityConfigurerAdapter {
@Autowired
UserDetailsService userDetailsService;
@Override
protected void configure(HttpSecurity http) throws Exception {
http
.sessionManagement()
.sessionFixation().changeSessionId();// 기본값 -> 세션은 유지하되 세션아이디는 계속 새로 발급(servlet 3.1이상 기본 값)
// none, migrateSession, newSession
}
}
Java
복사
•
none()
: 세션이 새로 생성되지 않고 그대로 유지되기 때문에 세션 고정 공격에 취약하다.
•
migrateSession()
: 새로운 세션도 생성되고 세션아이디도 발급된다. (sevlet 3.1 이하 기본 값) + 이전 세션의 속성값들도 유지된다.
•
newSession()
: 세션이 새롭게 생성되고, 세션아이디도 발급되지만, 이전 세션의 속성값들을 유지할 수 없다.
세션 정책
인증처리를 할 때 꼭 스프링 시큐리티에서 세션을 생성할 필요는 없고, 오히려 외부 서비스를 통해 인증 토큰을 발급하는 방식을 사용 할 수도 있다. 예를들어 JWT 토큰을 사용하거나, KeyCloak같은 외부 서비스를 사용할수도 있다. 이런 경우에는 굳이 스프링 시큐리티를 통해 세션을 생성할 필요가 없다. 그래서 이런 세션 생성 정책도 설정을 통해 지정해 줄 수 있다.
세션 정책 설정하기
@Configuration
@EnableWebSecurity
public class SecurityConfig extends WebSecurityConfigurerAdapter {
@Autowired
UserDetailsService userDetailsService;
@Override
protected void configure(HttpSecurity http) throws Exception {
http
.sessionManagement()// 세션 관리 기능이 작동함.
.sessionCreationPolicy(SessionCreationPolicy.IF_REQUIRED);
}
}
Java
복사
•
SessionCreationPolicy.Always : 스프링 시큐리티가 항상 세션 생성
•
SessionCreationPolicy.IF_REQUIRED : 스프링 시큐리티가 필요 시 생성(default)
•
SessionCreationPolicy.Never : 스프링 시큐리티가 생성하지 않지만 이미 존재하면 사용
•
SessionCreationPolicy.Stateless: 스프링 시큐리티가 생성하지 않고 존재해도 사용하지 않음.
→ JWT 토큰방식을 사용할 때는 Stateless 정책을 사용한다.
세션 제어 필터:
SessionManagementFilter, ConcurrentSessionFilter
SessionManagementFilter
1.
세션관리 → 인증 시 사용자의 세션정보를 등록, 조회, 삭제 등의 세션 이력을 관리
2.
동시적 세션 제어 → 동일 계정으로 접속이 허용되는 최대 세션수를 제한
3.
세션 고정 보호 → 인증 할 때마다 세션 쿠키를 새로 발급하여 공격자의 쿠키 조작을 방지
4.
세션 생성 정책 → Always, if_required, Never, Stateless
ConcurrentSessionFilter
•
매 요청 마다 현재 사용자의 세션 만료 여부 체크
•
세션이 만료되었을 경우 즉시 만료 처리
•
session.isExired() == true
◦
로그아웃 처리
◦
즉시 오류 페이지 응답(This session has been expired)
SessionManagementFilter, ConcurrentSessionFilter - Flow
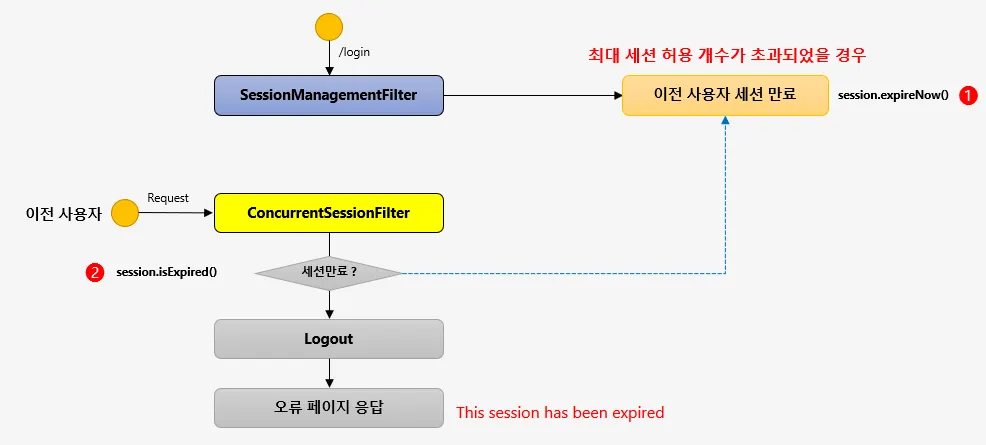
1.
Login 시도
2.
최대 세션 허용 개수 확인
→ 최대 세션 허용 개수가 초과되었을 경우 정책별 로직 수행(이전 사용자 세션 만료/ 현재 사용자 인증 실패) : session.expireNow()
3.
이전사용자 가 자원접근(Request) 시도
4.
ConcurrentSessionFilter에서 이전 사용자의 세션이 만료되었는지 확인.
→ SessionManagementFilter 안의 설정 참조
5.
로그아웃 처리 후 오류 페이지 응답
→ This session has been expired
SessionManagementFilter, ConcurrentSessionFilter - sequence diagram
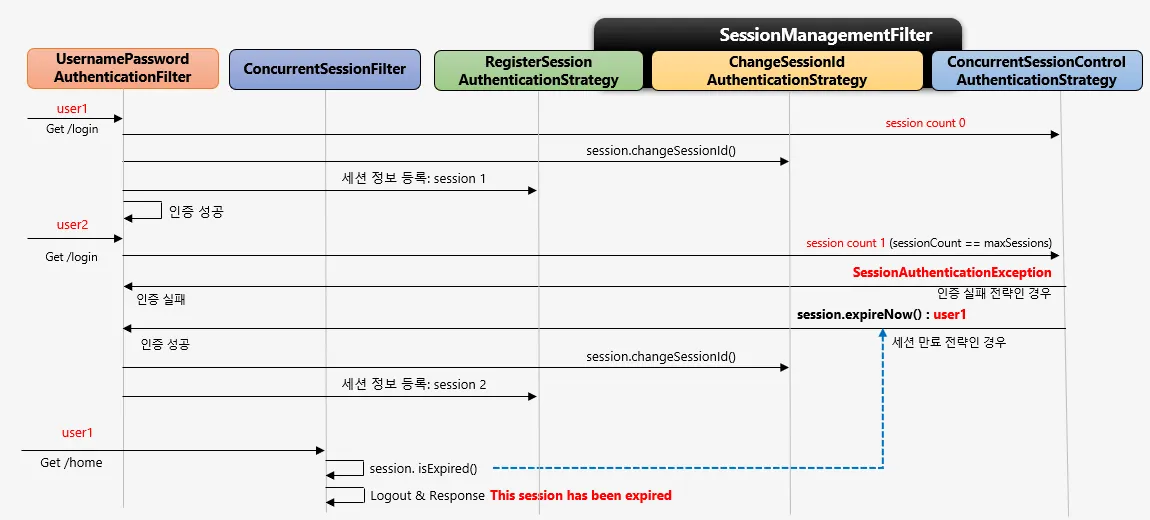
Sequence diagram
권한설정과 표현식
선언적 방식
•
URL
◦
http.antMatchers("/users/**").hasRole("USER")
•
Method
◦
@PreAuthorize("hasRole('USRE')")
◦
public void user(){System.out.println("user")}
동적 방식 - DB 연동 프로그래밍
•
URL
•
Method
권한 설정
@Override
protected void configure(HttpSecurity http) throws Exception {
http
.antMatcher("/shop/**") //특정 경로를 지정 해당 메서드를 생략하면 모든 경로에 대해 검색하게 된다.
.authorizeRequests() //보안 검사기능 시작
.antMatchers("/shop/login", "/shop/users/**").permitAll() //해당경로에 대한 모든 접근을 하용한다.
.antMatchers("/shop/mypage").hasRole("USER") // /show/mypage는 USER권한을 가지고있는 사용자에게만 허용한다.
.antMatchers("/shop/admin/pay").access("hasRole('ADMIN')")
.antMatchers("/shop/admin/**").access("hasRole('ADMIN') or hasRole('SYS ')")
.anyRequest().authenticated();
}
Java
복사
참고: 설정시 구체적인 경로("/shop/admin/pay")가 먼저 설정되고 그 다음에 더 넓은 범위가 설정되고, 되야하는 이유는 불필요한 검사를 막기 위해서이다.
예를들어, .antMatchers("/shop/admin/**").access("hasRole('ADMIN') or hasRole('SYS ')") 설정이 더 위로간다면, SYS유저는 해당 검사를 통과하고 그 아래에서 걸리게 된다.
표현식
Default view
Search
예제 코드
/*Application*/
@Slf4j
@Configuration
@EnableWebSecurity
public class SecurityConfig extends WebSecurityConfigurerAdapter {
@Autowired
UserDetailsService userDetailsService;
/*메모리방식으로 사용자 생성및 비밀번호와 권한 설정 메서드*/
@Override
protected void configure(AuthenticationManagerBuilder auth) throws Exception {
//{noop}비밀번호 형식을 적어준 것으로 noop은 따로 인코딩방식X
auth.inMemoryAuthentication().withUser("user").password("{noop}1111").roles("USER");
auth.inMemoryAuthentication().withUser("sys").password("{noop}1111").roles("SYS","USER");
auth.inMemoryAuthentication().withUser("admin").password("{noop}1111").roles("ADMIN","SYS","USER");
}
@Override
protected void configure(HttpSecurity http) throws Exception {
http
.authorizeRequests()
.antMatchers("/user").hasRole("USER")
.antMatchers("/admin/pay").hasRole("ADMIN")
.antMatchers("/admin/**").access("hasRole('ADMIN') or hasRole('SYS')")
.anyRequest().authenticated();
http
.formLogin();
}
}
/*Controller*/
@RestController
public class SecurityController {
@GetMapping("/")
public String index(){
return "home";
}
@GetMapping("loginPage")
public String loginPage(){
return "loginPage";
}
@GetMapping("/user")
public String user(){
return "user";
}
@GetMapping("/admin/pay")
public String adminPay(){
return "adminPay";
}
@GetMapping("/admin/**")
public String adminAll(){
return "admin";
}
}
Java
복사
•
configure()메서드의 순서 /admin/** 과 /admin/pay 의 순서를 바꾸면 어떻게 될 것인가?◦
SYS권한 유저가 /admin/pay 에 접근 권한 검사를 하기전 /admin/** 권한 검사에서 통과가 되버리기 때문에 /admin/pay 경로 접속이 허용되게 된다.
그렇기 때문에 접속 권한 설정시 작은 부분에서 큰부분으로 설정을 해야 한다.
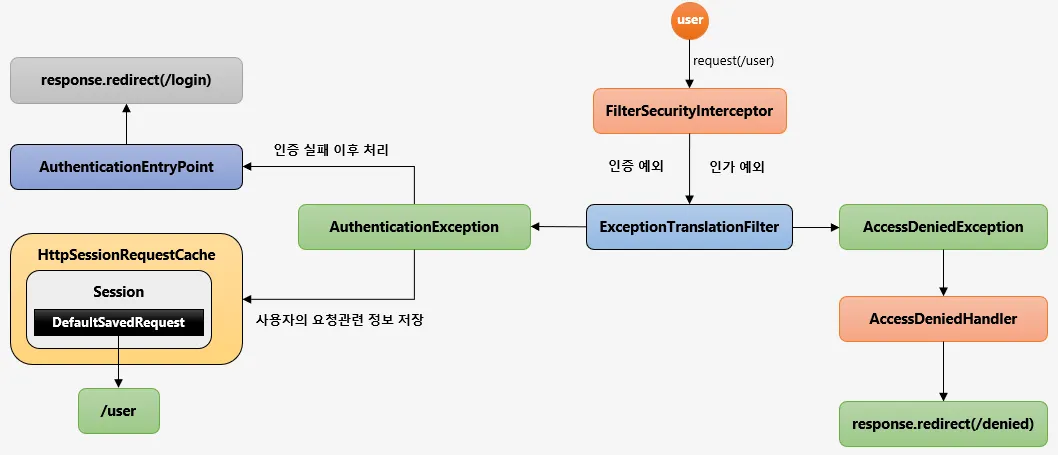
예외처리 및 요청 캐시 필터:
ExceptionTranslationFilter, RequestCacheAwareFilter
SpringSecurity가 관리하는 보안 필터중 마지막 필터가 FilterSecurityInterceptor이고, 바로 전 필터가 ExceptionTranslationFilter이고 해당 필터에서 사용자의 요청을 받을 때, 그 다음 필터로 그 요청을 전달할 때 try-catch로 감싸서 FilterSecurityInterceptor 를 호출하고 있고, 해당 필터에서 생기는 인증및 인가 예외는
ExceptionTranslationFilter로 throw 하고 있다.
AuthenticationException
•
인증 예외 처리
1.
AuthenticationEntryPoint 호출
→ 로그인 페이지 이동, 401(Unauthorized) 오류 코드 전달 등
2.
인증 예외가 발생하기 전의 요청정보를 저장
→ RequestCache - 사용자의 이전 요청 정보를 세션에 저장하고 이를 꺼내 오는 캐시 메커니즘
→ SavedRequest - 사용자가 요청했던 request 파라미터 값들, 그 당시의 헤더값들 등이 저장
AccessDeniedException
•
인가 예외 처리
◦
AccessDeniedHandler 에서 예외 처리하도록 제공
Flow
1.
익명 사용자가 /user에 접근을 시도한다고 가정한다.
2.
FilterSecurityInterceptor 권한 필터가 해당 요청(/user)을 받았지만, 해당 유저는 인증을 받지 않은 상태.
3.
해당 필터는 인증 예외를 발생한다.
→ 정확히는 인가 예외를 던진다. 왜냐하면 해당 사용자는 익명(anonymouse)사용자이기에 인증을 받지 않은 상태라서 인가 예외(AccessDeniedException)로 빠진다.
4.
인가 예외(AccessDeniedException)는 익명 사용자이거나 RememberMe사용자일 경우 AccessDeniedHandler를 호출하지 않고 AuthenticationException 에서 처리하는 로직으로 보내게 된다.
5.
인증 예외 (AuthenticationException) 두 가지 일을 한다.
a.
AuthenticationEntryPoint 구현체 안에서 login페이지로 리다이렉트 한다. (인증 실패 이후)
→ Security Context를 null로 초기화해주는 작업도 해준다.
b.
예외 발생 이전에 유저가 가고자 했던 요청정보를 DefaultSavedRequest객체에 저장하고 해당 객체는 Session에 저장되고 Session 에 저장하는 역할을 HttpSessionRequestCache에서 해준다.
1.
인증절차를 밟은 일반 유저가 /user자원에 접근을 시도하는데 해당 자원에 설정된 허가 권한이 ADMIN일 경우.
2.
권한이 없기 때문에 인가 예외 발생
3.
AccessDeniedException이 발생한다.
4.
AccessDeniedHandler 호출해서 후속작업을 처리한다.
→ 보통은 denied 페이지로 이동한다.
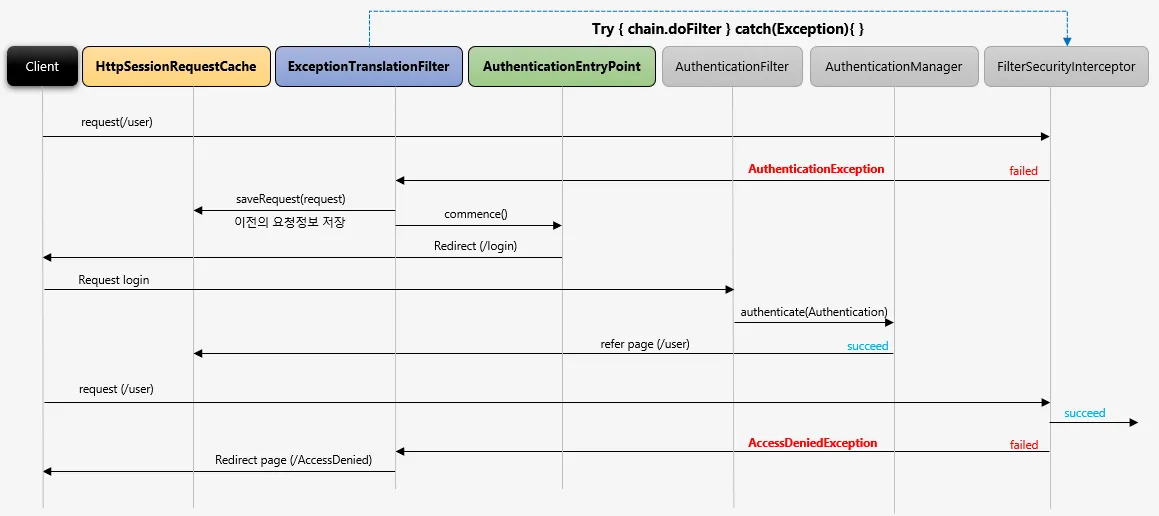
API 살펴보기
Code Content
Sequence Diagram
사이트 간 요청 위조:
CSRF, CsrfFilter
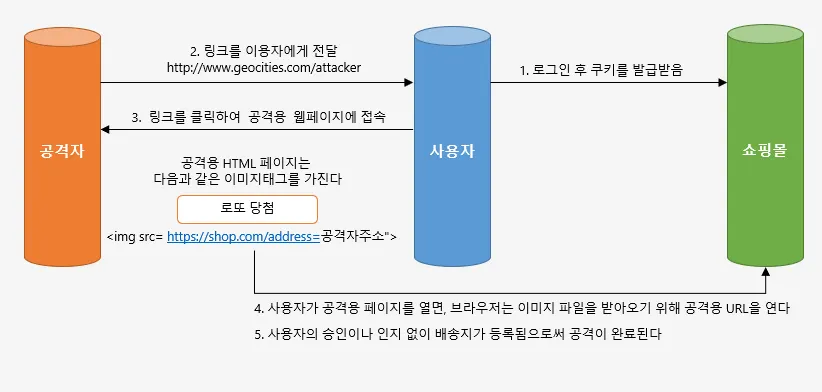
: 사용자가 쇼핑몰에 접속하여 로그인 후 쿠키를 발급받은 뒤 공격자가 사용자의 이메일로 특정 링크를 전달하고 사용자가 해당 링크를 클릭하게 되면, 공격용 웹페이지에 접속하게 되고, 해당페이지에 '로또당첨'이라는 이미지가 노출된다. 그리고 유저가 로또당첨 이미지를 클릭하면 쇼핑몰에 특정 URL로 요청을 하게되는데 해당 쿠키정보를 가지고 있기 때문에 해당 요청에 대해서 정상적으로 동작을 하게 된다.
이처럼 사용자의 의도와는 무관하게 공격자가 심어놓은 특정 방식을 통해 자원 요청을 하게되고 그것을 응답을 받을 수 있도록 하는 것을 CSRF(사이트 간 요청 위조) 라 한다.
CsrfFilter
•
모든 요청에 랜덤하게 생성된 토큰을 HTTP 파라미터로 요구
•
요청 시 전달되는 토큰 값과 서버에 저장된 실제 값과 비교한 후 만약 일치하지 않으면 요청은 실패한다.
•
Client
<input type="hidden" name="${csrf.parameterName}" value="${_csrf.token}"/>
HTML
복사
◦
HTTP 메소드: PATCH, POST, PUT, DELETE
•
Spring Security
◦
http.csrf(): 기본 활성화되어 있음
◦
http.csrf().disabled(): 비활성화