

실전 프로젝트 생성
1. 프로젝트 명
•
core-spring-security
2. 프로젝트 기본 구성
•
의존성 설정, 환경설정 UI 화면 구성, 기본CRUD 기능
•
스프링 시큐리티 보안 기능을 점진적으로 구현 및 완성
3. Springboot, Spring MVC, Spring Data JPA
•
기초 지식 학습 권장
•
스프링 시큐리티 기술에 집중
4. 프로그램 설치
•
DB - Postgresql Server
5. 사용하는 라이브러리 목록
•
JPA
•
Spring WEB
•
Spring devtool
•
thymeleaf
•
postgresql
•
lombok
6. application.yml
spring:
profiles:
active: local
datasource:
url: jdbc:postgresql:주소
username: 아이디
password: 비밀번호
driver-class-name: org.postgresql.Driver
jpa:
hibernate:
ddl-auto: create
properties:
hibernate:
# show_sql:true
format_sql: true
default_batch_fetch_size: 100
use_sql_comments: true
open-in-view: false
thymeleaf:
prefix: classpath:/templates/
suffix: .html
cache: false
devtools:
livereload:
enabled: true
restart:
enabled: true
main:
allow-bean-definition-overriding: true
logging:
level:
org.hibernate.SQL: debug
# org.hibernamte.type: trace
YAML
복사
7. Git 주소
정적 자원 정리 - WebIgnore 설정
→ 사용자가 자원에 접근 요청을 하면 스프링 시큐리티에서 인증 및 인가검사를 하게되는데, 기본적으로 JS, CSS, Image 에서도 보안검사를 하게 되는데 해당 파일들에 대해서는 보안검사를 안해줘도 크게 문제가 되지 않는다. 그렇기 때문에 보안 필터를 거치지 않게 함으로써 성능 향상 최적화를 노려볼 수 있습니다.
•
JS, CSS, Image 파일 등 보안 필터를 적용할 필요가 없는 리소스를 설정
@Override
public void configure(WebSecurity web) throws Exception {
web.ignoring().requestMatchers(PathRequest.toStaticResources().atCommonLocations());
}
Java
복사
참고: .antMatchers("/","/user").permitAll() 이런 식으로 permitAll()을 통해 접근을 허가해줄 수도 있지만, 해당 방법으로는 허가를 해주더라도 보안검사를 한 뒤 통과 해주는 반면, ignoring()을 이용한 방법은 보안검사 자체를 안하기에 성능적으로 더 권장되는 방법이다.
사용자 DB등록 및 PasswordEncoder
•
비밀번호를 안전하게 암호화 하도록 제공
•
Spring Security 5.0 이전에는 기본 PasswordEncoder 가 평문을 지원하는 NoOpPasswordEncoder (Deprecated)
•
생성
◦
PasswordEncoder passwordEncoder = PasswordEncoderFactories.createDelegatingPasswordEncoder()
◦
여러개의 PasswordEncoder 유형을 선언한 뒤, 상황에 맞게 선택해서 사용할 수 있도록 하는 Encoder이다
•
암호화 포맷 → {id}encodedPassword
◦
기본 포맷은 Bcrypt: {bcrypt}$2a$10$dXJ3SW6G7P50lGmMkkmwe.20cQQubK3.HZWzG3YB1tlRy.fqvM/BG
◦
알고리즘 종류: bcrypt, noop, pbkdf2, scrypt, sha256
•
인터페이스
◦
encode(password)
▪
패스워드 암호화
◦
matches(rawPassword, encodedPassword)
▪
패스워드 비교
예제 소스
•
domain/ entity / Account
Code
•
domain/ dto / AccountDto
Code
•
controller / user / UserController
Code
•
service / UserService
Code
•
service / impl / UserServiceImpl
Code
•
security / SecurityConfig
Code
•
resource / templates / user / register
Code
DB연동 인증 처리(1)
이제 기존의 inMemory방식의 계정인증 과정을 없애고 DB기준으로 계정 연동을 구현해보도록 하겠습니다.
1. CustomUserDetailsService 구현
→ 회원 가입시 유저정보를 UserDetails 타입으로 만들어서 반환해주기 위해 CustomUserDetailsService를 구현한다 UserDetailsService 를 상속(implements)받아 loadUserByUsername 메서드를 오버라이딩 해서 적절하게 개발자가 만든 Account와 매칭시켜준다.
Code
2. AccountContext 구현
→ CustomUserDetailsService를 보면 최종적으로 UserDetails 타입으로 반환을 해줘야 한다. 그렇기에 AccountContext 를 만들어서 UserDetails 타입으로 객체를 만들어주는 구현체를 만들어야 한다. User 클래스를 상속받아 생성자를 구현한다.
Code
3. SecurityConfig에 CustomUserDetailsService 등록
→ 스프링 시큐리티 설정클래스에 위에서 구현한 CustomUserDetailsService를 등록해서 사용하도록 한다.
Code
DB연동 인증 처리(2)
AuthenticationProvider를 구현해서 비밀번호 및 회사정책별 보안검사 수행 후 인증객체를 반환하는 메서드를 구현해보겠습니다.
1. security / provider / CustomUserDetailsService
Code
2. security / config / SecurityConfig 수정
Code
커스텀 로그인 페이지 생성하기
1. templates / login
Code
2. security / config / SecurityConfig
Code
로그아웃 및 인증에 따른 화면 보안 처리
로그아웃 방법
•
<form> 태그를 사용해서 POST로 요청
•
<a> 태그를 사용해서 GET으로 요청 - SecurityContextLogoutHandler활용
인증 여부에 따라 로그인/로그아웃 표현
<li sec:authorize="isAnonymouse()"><a th:href="@{/login}">로그인</a></li>
<li sec:authorize="isAuthenticated()"><a th:href="@{/logout}">로그아웃</a></li>
Java
복사
참고: 참고로 시큐리티의 해당 기능 sec:authorize="isAnonymouse()" 을 사용하기 위해선 dependence 를 추가해줘야 한다.
Gradle: implementation 'org.thymeleaf.extras:thymeleaf-extras-springsecurity5'
html: <html xmlns:sec="http://www.thymeleaf.org/thymeleaf-extras-springsecurity5">
참고: 주로 사용되는 security5 메서드 리스트(ex: <li... sec:authorize="isAnonymouse()"></li>)
isAnonymouse() : 익명 사용자일 경우 true
isAuthenticated(): 로그인한 사용자일 경우
hasAuthority(ROLE): 권한 확인
1. templates/ layout / top
Code
2. controller / login / LoginController
Code
인증 부가 기능
→ WebAuthenticationDetails, AuthenticationDetailsSource
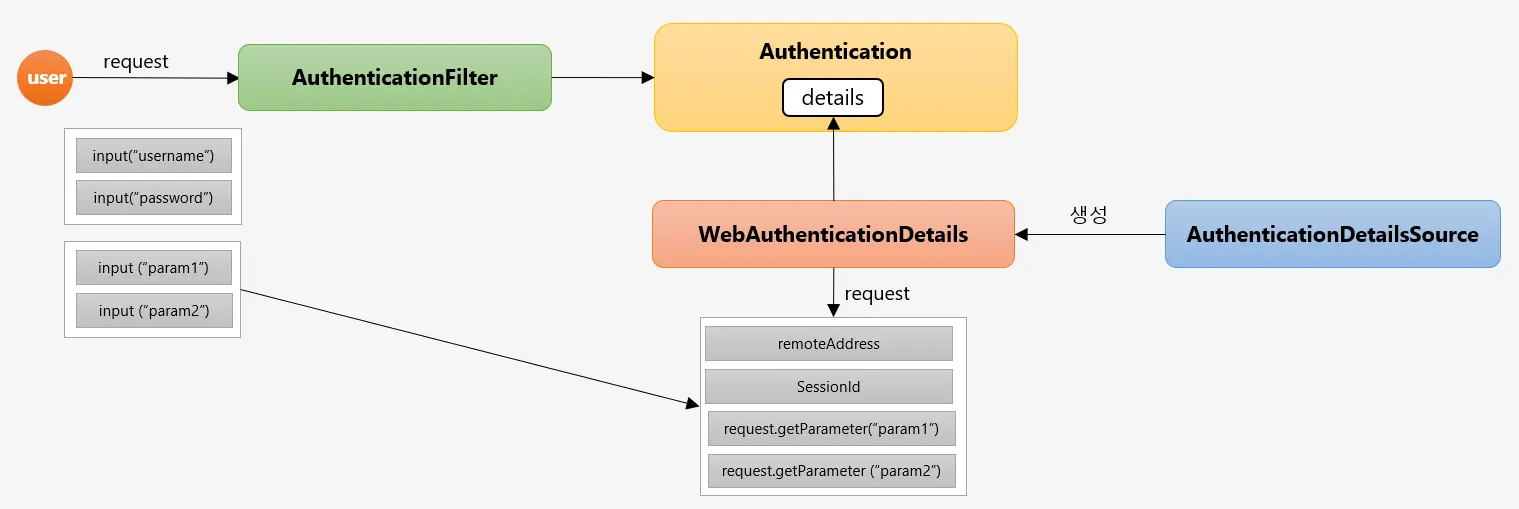
→인증필터( AuthenticationFilter )에서 인증처리를 하게 되면 인증객체(Authentication)을 생성해 username 와 password를 저장합니다.
그리고 내부적으로 Object타입의 details속성을 가지고 있는데, 이 details의 속성에 AuthenticationDetailsSource 에서 WebAuthenticationDetails 객체를 만들어 저장합니다.
이렇게 저장된 WebAuthenticationDetails 클래스에서는 사용자가 추가적으로 전달한 파라미터를 가져와 저장하는 역할을 합니다.
(request.getparameter("param1"))
•
WebAuthenticationDetails
◦
인증 과정 중 전달된 데이터를 저장
◦
Authentication의 details속성에 저장
•
AuthenticationDetailsSource
◦
WebAuthenticationDetails객체를 생성
1. security / common / WebAuthenticationDetails
Code
2. security / common / FormAuthenticationDetailsSource
Code
3. security / service / provider / FormAuthenticationProvider → 수정
Code
4. security/ config / SecurityConfig - 설정 등록
Code
인증 성공 핸들러 - CustomAuthenticationSuccessHandler
: 인증 성공 이후에 후처리를 원하는대로 정의하여 로직을 수행하도록 하는 핸들러를 구현해보도록 하겠습니다.
로그인 시도 → 실패 → 로그엔 페이지 이동 → 로그인 시도 → 성공 → 최초 로그인할 때 가려했던 페이지로 이동
1. security / handler / CustomAuthenticationSuccesshandler
Code
2. security / config / Securityconfig 설정 등록
Code
 참고: RequestCache는 어떻게, 어느시점에 저장되는 것인가?
Content
인증 실패 핸들러 - CustomAuthenticationFailureHandler
인증에 실패했을 경우 후처리를 하는 핸들러를 사용자정의 구현하도록 하겠습니다.

•
인증 성공 시 후처리 핸들러 등록이 가능하듯 인증 실패 시 후 처리 핸들러 등록도 가능합니다.
1. security / handler / CustomAuthenticationFilureHandler
Code
2. security / config / SecurityConfig 설정 추가 등록
Code
인증 거부 처리 - Access Denied
: 인증을 시도하다가 발생한 예외는 인증 필터가 받게 된다.
하지만, 인증 성공 이후 특정 자원에 접근하려는 경우에 해당 자원에 접근권한이 없을 경우에는 인가예외가 발생하게 됩니다.
인가예외는 FilterSecurityInterceptor 에서 받아 ExceptionTranslationFilter로 보내게 되어 예외를 처리하게 된다.
핵심은 인증예외 중 발생한 예외는 인증처리필터(UsernamePaswordAuthenticationFilter) 에서 처리하지만, 인가처리는 예외 발생시
ExceptionTranslationFilter에서 처리한다는점 입니다.
그렇기에 AccessDeniedhandler의 구현체를 만들어서 로직을 구현하도록 하겠습니다.
1. security / handler / AccessDeniedHandler
Code
2. security / config / SecurityConfig 설정 추가 등록
Code