

목차
0. 프로젝트 생성
준비물
•
JDK: Java 11 +
•
IDE: IntelliJ or Eclipse
⇒ 여기서는 IntelliJ를 기본으로 한다.
•
Dependencies: Spring Web, Lombok, Thymeleaf
 아래 방법에 대해 이미 숙지가 끝났고, 더 간결하게 하고싶다면 아래 git 프로젝트를 사용하자.
 Tip. IntelliJ Gradle 대신 자바 직접 실행
Build툴에서 기본적으로 Gradle을 통해서 실행하는게 IntelliJ의 기본설정인데 이를 java로 변경하면 더 빠르다.
•
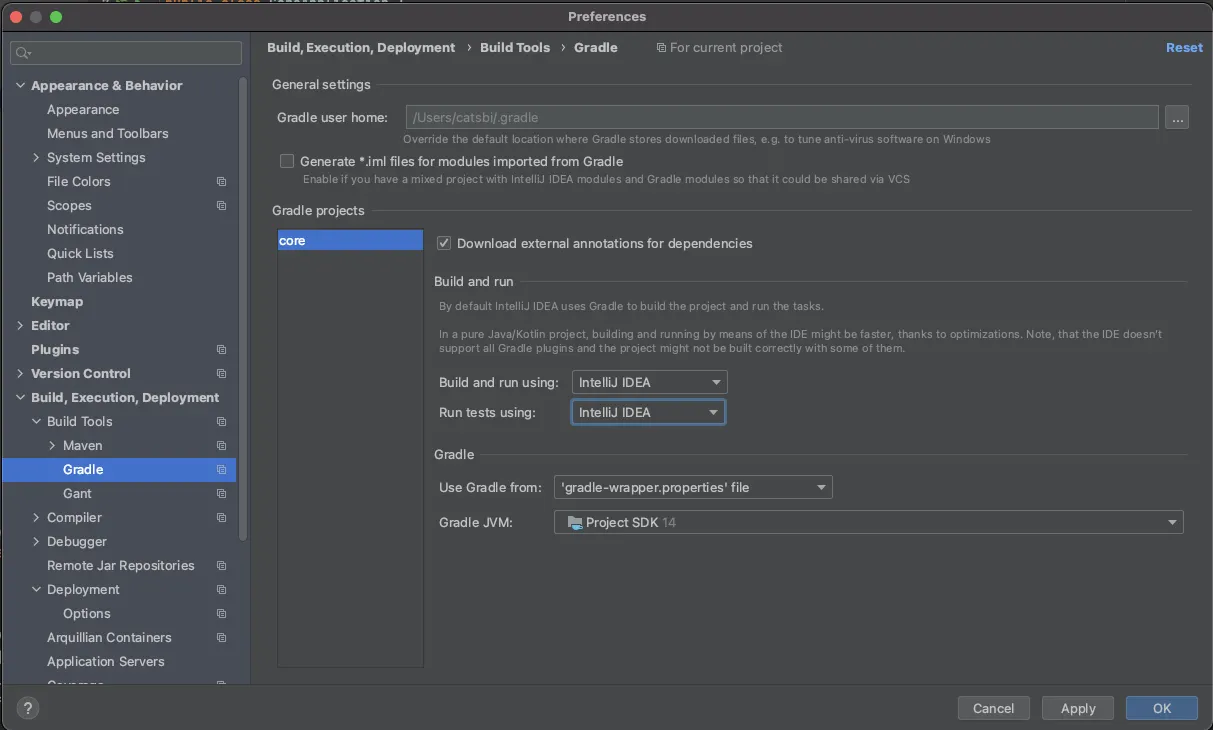
Preferences → Build, Execution, Deployment → Build Tools → Gradle
◦
Build and run using → Gradle IntelliJ IDEA
◦
Run tests using → Gradle IntelliJ IDEA
1. 타임리프 소개

특징
•
서버 사이드 HTML 렌더링(SSR)
: 타임리프는 백엔드 서버에서 HTML을 동적으로 렌더링하는 용도로 사용된다.
사용법은 SSR이 다 비슷하기에 학습하기에도 어렵지 않고, 페이지가 어느정도 정적이고 빠른 생산성이 필요한 경우 백엔드 개발자가 개발해야하는 일이 생기는데 이 경우 타임리프는 좋은 선택지이다.
•
네츄럴 템플릿
:타임리프는 순수한 HTML을 최대한 유지하려는 특징이 있다. 이게 JSP와의 큰 차이점으로 타임리프로 작성한 파일은 확장자도 .HTML이고 웹 브라우저에서 직접 파일을 열어도 내용을 확인할 수 있다.
물론, 이 경우 동적인 결과 렌더링은 되지 않지만 HTML 마크업 언어가 어떻게 되는지 확인할 수 있다.
•
스프링 통합 지원
:타임리프는 스프링과 자연스럽게 통합되어 스프링의 다양한 기능을 쉽게 사용할 수 있다.
사용법
타임리프는 문서 최상단에 다음과 같은 코드를 넣어서 사용할 수 있다.
<html xmlns:th="http://www.thymeleaf.org">
HTML
복사
문법 요약
아래에서 더 자세히알아보겠지만 타임리프에서 사용하는 문법은 다음과 같다.
간단한 표현
•
변수 표현식: ${...}
•
선택 변수 표현식: *{...}
•
메세지 표현식: #{...}
•
링크 URL 표현식: @{...}
•
조각 표현식: ~{...}
리터럴
•
텍스트: 'one text', 'Anothr one!', ...
•
숫자: 0, 34, 3.0, 12.3, ...
•
불린: true, false
•
널: null
•
리터럴 토큰: one, sometext, main, ...
문자 연산
•
문자 합치기: +
•
리터럴 대체: | The name is ${name}|
산술 연산
•
Binary operators: +, -, *, /, %
•
Minus sign (unary operatior): -
불린 연산
•
Binary operators: and, or
•
Boolean negation (unary operator): !, not
비교와 동등
•
비교: >, <, >=, <= (gt, lt, ge, le)
•
동등 연산: ==, != (eq, ne)
조건 연산
•
If-then: (if) ? (then)
•
If-then-else: (if) ? (then) : (else)
•
Default: (value) ?: (defaultvalue)
특별한 토큰
•
No-Operation: _
2. 텍스트 - text, utext
서버에서 Model에 담아준 각종 속성(attribute)들을 서버사이드 템플릿 엔진인 타임리프에서는 여러 방법으로 표현을 할 수 있다. 가장 기본적인 텍스트 출력 문법은 다음과 같다.
1.
th:text
<span th:text="${attributeName}"></span>
HTML
복사
2.
[[...]]
<span>hello [[${attributeName}]]</span>
HTML
복사
예제
기존에 생성한 프로젝트를 이용해 예제코드를 작성해보자.
•
BasicController
@Controller
@RequestMapping("/basic")
public class BasicController {
@GetMapping("text-basic")
public String textBasic(Model model) {
model.addAttribute("data", "Hello Spring");
return "basic/text-basic";
}
}
Java
복사
•
basic/text-basic.html
<!DOCTYPE html>
<html lang="en" xmlns:th="http://www.thymeleaf.org">
<head>
<meta charset="UTF-8">
<title>Title</title>
</head>
<body>
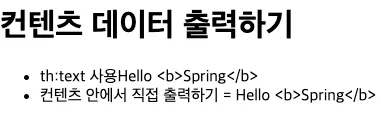
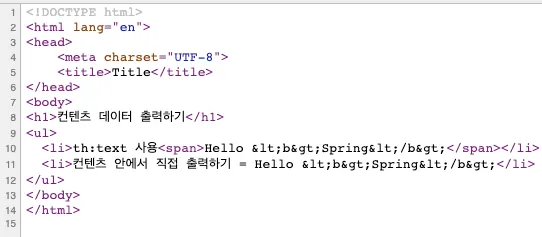
<h1>컨텐츠 데이터 출력하기</h1>
<ul>
<li>th:text 사용<span th:text="${data}"></span></li>
<li>컨텐츠 안에서 직접 출력하기 = [[${data}]]</li>
</ul>
</body>
</html>
HTML
복사
•
실행 결과

Escape
만약 서버에서 속성으로 추가할 데이터에 html 태그(ex: <b></b>)를 추가해서 타임리프에서 태그효과까지 같이 사용하고 싶다면 어떻게 해야할까?
컨트롤러에서 model.addAttribute("data", "<b>spring!</b>"); 이렇게 작성하면 될까? 다음 화면은 단순히 서버에서 addAttribute에 태그가 포함된 속성을 추가했을때의 결과다.
우리가 의도한대로 나오지 않고 태그까지 다 출력되버렸다. 이를 소스보기를 통해 살펴보면 다음과 같이 나온다.
타임리프가 제공하는 th:text, [[...]] 은 기본적으로 이스케이프(escape)를 제공하기 때문인데, 그 때문에 HTML에서 사용하는 특수 문자(ex: <, >)를 태그의 시작이 아닌 문자로 표현할 수 있도록 <,b> 이런식으로 변경되며 이를 HTML 엔티티라 한다.
그럼 어떻게 의도대로 사용하지? Unescape!
그래서 다시 본론으로 돌아와서 내가 HTML 엔티티로 변경하지 않고 HTML 태그로 사용하고 싶다면 어떻게 해야할까? 다시 말해 escape되지않고 unescape하게 쓰고싶다면 어떻게 해야할까?
타임리프에서는 이를 위해 두 가지 기능을 제공한다
•
th:utext
•
[(...)]
⇒ 사용 예제
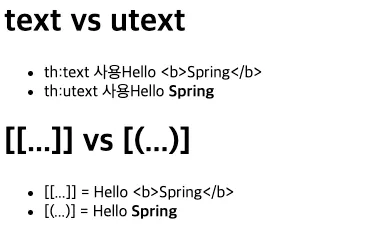
<h1>text vs utext</h1>
<ul>
<li>th:text 사용<span th:text="${data}"></span></li>
<li>th:utext 사용<span th:utext="${data}"></span></li>
</ul>
<h1><span th:inline="none">[[...]] vs [(...)]</span> </h1>
<ul>
<li><span th:inline="none">[[...]] = </span>[[${data}]] </li>
<li><span th:inline="none">[(...)] = </span>[(${data})] </li>
</ul>
HTML
복사
•
참고: th:inline은 이 태그안에 있는 내용은 타임리프가 해석하지말라는 의미의 옵션인다.
•
실행 결과
3. 변수 - SpringEL
타임리프에서 변수를 사용하는 변수 표현식을 몇가지 알아보자.
기본적으로 변수 표현식은 ${...} 으로 사용하는데, 단순히 값을 표시하는 것인데, 이 변수 표현식에는 SpringEL이라는 스프링이 제공하는 표현식을 사용할 수 있다.
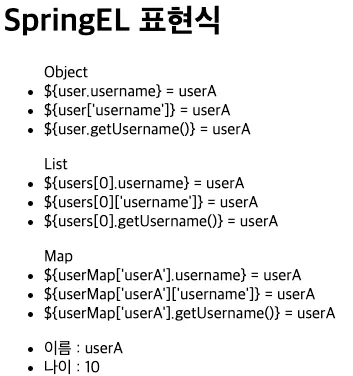
SpringEL 표현식
단순한 변수라면 ${data}로 바로 표현이 가능하지만, Object나, List같은 객체는 다음과 같이 사용할 수 있다.
•
Object
◦
data.field: data의 field 프로퍼티 접근 (data.getField())
◦
data['field']: 위와 같다(data.getField())
◦
data.getField(): data의 getField()메서드를 직접 호출 할 수 있다.
•
List
◦
list[0].field: List의 첫 번째 데이터를 찾아 field 프로퍼티 접근한다.
◦
list[0]['field']: 위와 동일하다.
◦
list[0].getField(): List에서 첫 번째 회원을 찾아 메서드를 직접 호출 할 수 있다.
◦
list.get(0).xxx: List의 get메서드를 통해 데이터를 찾아 프로퍼티 접근도 가능하다.
•
Map
◦
map['key'].field: Map에서 key를 찾아 field 프로퍼티에 접근한다.
⇒ map.get('key').getField()와 동일하다.
◦
map['key']['field']: 위와 동일하다.
◦
map['key'].getField(): Map에서 key를 찾아 직접 메서드를 호출한다.
지역 변수 선언
th:with 를 이용해 지역변수로 사용해서 사용할수도 있는데 지역변수이기에 선언한 태그 안에서만 사용가능하다.
<div th:with="item=${list[0]}">
<ul>
<li>이름 : <span th:text="${item.username}"></span></li>
<li>나이 : [[${item.age}]]</li>
</ul>
</div>
HTML
복사
예제 코드
•
BasicController
@Controller
@RequestMapping("/basic")
public class BasicController {
@GetMapping("text-basic")
public String textBasic(Model model) {
model.addAttribute("data", "Hello <b>Spring</b>");
return "basic/text-basic";
}
@GetMapping("/variable")
public String variable(Model model) {
User userA = new User("userA", 10);
User userB = new User("userB", 20);
List<User> list = new ArrayList<>(Arrays.asList(userA, userB));
Map<String, User> map = new HashMap<>();
map.put("userA", userA);
map.put("userB", userB);
model.addAttribute("user", userA);
model.addAttribute("users", list);
model.addAttribute("userMap", map);
return "basic/variable";
}
@Data
static class User{
private String username;
private int age;
public User(String username, int age) {
this.username = username;
this.age = age;
}
}
}
Java
복사
⇒ 테스트를 위해 Inner Class로 User객체를 만들었다.
⇒ Model에 Object, List, Map 타입의 데이터를 모두 넣어준다.
•
basic/variable.html
<!DOCTYPE html>
<html xmlns:th="http://www.thymeleaf.org">
<head>
<meta charset="UTF-8">
<title>Title</title>
</head>
<body>
<h1>SpringEL 표현식</h1>
<ul>Object
<li>${user.username} = <span th:text="${user.username}"></span></li>
<li>${user['username']} = <span th:text="${user['username']}"></span></li>
<li>${user.getUsername()} = <span th:text="${user.getUsername()}"></span></li>
</ul>
<ul>List
<li>${users[0].username} = <span th:text="${users[0].username}"></span></li>
<li>${users[0]['username']} = <span th:text="${users[0]['username']}"></span></li>
<li>${users[0].getUsername()} = <span th:text="${users[0].getUsername()}"></span></li>
</ul>
<ul>Map
<li>${userMap['userA'].username} = <span th:text="${userMap['userA'].username}"></span></li>
<li>${userMap['userA']['username']} = <span th:text="${userMap['userA']['username']}"></span></li>
<li>${userMap['userA'].getUsername()} = <span th:text="${userMap['userA'].getUsername()}"></span></li>
</ul>
<div th:with="item=${users[0]}">
<ul>
<li>이름 : <span th:text="${item.username}"></span></li>
<li>나이 : [[${item.age}]]</li>
</ul>
</div>
</body>
</html>
HTML
복사
•
실행 결과
4. 기본 객체들
타임리프는 다음과같이 기본 객체들을 사용할 수 있게 제공해준다.
•
${#reuqest}
•
${#response}
•
${#locale}
•
${#session}
•
${#servletContext}
기본객체에 대한 접근 편의 메서드
기본 객체들의 프로퍼티 접근을 하기위해서 편의 메서드가 없다면 request.getParameter("data") 이런식으로 호출을 해야하지만, 타임리프에서는 이런 고생을 막기위해 편의 메서드를 제공한다.
•
HTTP 요청 파라미터 접근: param
⇒ Ex: ${param.paramData}
•
HTTP 세션 접근: session
⇒ Ex: ${session.sessionData}
•
스프링 빈 접근: @
⇒ Ex: ${@helloBean.hello('Spring')}
예제
•
BasicController에 view api, bean 추가
@Controller
@RequestMapping("/basic")
public class BasicController {
...
@GetMapping("/basic-objects")
public String basicObject(HttpSession httpSession) {
httpSession.setAttribute("sessionData", "Hello Session");
return "basic/basic-objects";
}
@Component("helloBean")
static class HelloBean{
public String hello(String data) {
return "Hello " + data;
}
}
}
Java
복사
•
basic/basic-objects.html
<!DOCTYPE html>
<html xmlns:th="http://www.thymeleaf.org">
<head>
<meta charset="UTF-8">
<title>Title</title>
</head>
<body>
<h1>식 기본 객체 (Expression Basic Objects)</h1>
<ul>
<li>request = <span th:text="${#request}"></span></li>
<li>response = <span th:text="${#response}"></span></li>
<li>session = <span th:text="${#session}"></span></li>
<li>servletContext = <span th:text="${#servletContext}"></span></li>
<li>locale = <span th:text="${#locale}"></span></li>
</ul>
<h1>편의 객체</h1>
<ul>
<li>Request Parameter = <span th:text="${param.paramData}"></span></li>
<li>session = <span th:text="${session.sessionData}"></span></li>
<li>spring bean = <span th:text="${@helloBean.hello('Spring!')}"></span></
li>
</ul>
</body>
</html>
HTML
복사
유틸리티 객체와 날짜
타임리프는 다음과 같이 편의성 유틸리티 객체들 또한 제공한다.
•
#message: 메세지, 국제화 처리
•
#dates: java.util.Date 서식 지원
•
#calendars: java.util.Calendar 서식 지원
•
#numbers: 숫자 서식 지원
•
#strings: 문자 관련 편의 기능
•
#objects: 객체 관련 기능 제공
•
#uris: URI 이스케이프 지원
•
#arrays: 배열 관련 기능 제공
•
#lists, #sets, #maps: 컬렉션 관련 기능
•
#ids: 아이디 처리 관련 기능 제공
•
#bools: boolean 관련 기능
Java 8 날짜는?
LocalDate, LocalDateTime, Instant 에 대응하는 유틸리티 객체는 안보이는데 이를 사용하기 위해서는 다음과 같은 추가 과정이 필요하다.
1.
타임리프 자바 8 날짜 지원 라이브러리 추가.
(important) 만약 spring-boot-starter-thymeleaf 라이브러리가 추가되어 있다면 해당 라이브러리가 자동으로 추가되어있기에 따로 의존성을 추가할 필요는 없다.
implementation group: 'org.thymeleaf.extras', name: 'thymeleaf-extras-java8time', version: '3.0.4.RELEASE'
Groovy
복사
2.
자바8 유틸용 유틸리티 객체
⇒ #temporals
3.
사용법
<span th:text="${#temporals.format(localDateTime, 'yyyy-MM-dd HH:mm:ss')}">
</span>
HTML
복사
4.
예제 코드
•
BasicController - "/date" api 추가
@GetMapping("/date")
public String date(Model model) {
model.addAttribute("localDateTime", LocalDateTime.now());
return "basic/date";
}
Java
복사
•
basic/date.html
<!DOCTYPE html>
<html xmlns:th="http://www.thymeleaf.org">
<head>
<meta charset="UTF-8">
<title>Title</title>
</head>
<body>
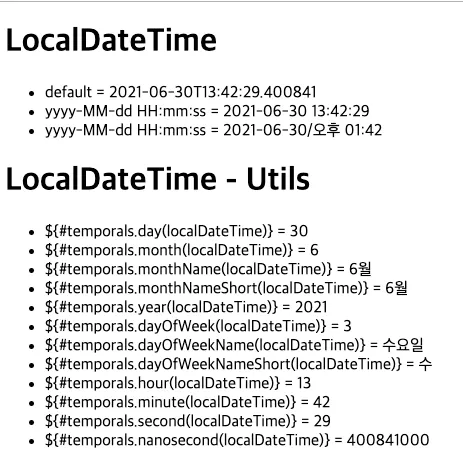
<h1>LocalDateTime</h1>
<ul>
<li>default = <span th:text="${localDateTime}"></span></li>
<li>yyyy-MM-dd HH:mm:ss = <span th:text="${#temporals.format(localDateTime, 'yyyy-MM-dd HH:mm:ss')}"></span></li>
<li>yyyy-MM-dd/a hh:mm = <span th:text="${#temporals.format(localDateTime, 'yyyy-MM-dd/a hh:mm')}"></span></li>
</ul>
<h1>LocalDateTime - Utils</h1>
<ul>
<li>${#temporals.day(localDateTime)} = <span th:text="${#temporals.day(localDateTime)}"></span></li>
<li>${#temporals.month(localDateTime)} = <span th:text="${#temporals.month(localDateTime)}"></span></li>
<li>${#temporals.monthName(localDateTime)} = <span th:text="${#temporals.monthName(localDateTime)}"></span></li>
<li>${#temporals.monthNameShort(localDateTime)} = <span th:text="${#temporals.monthNameShort(localDateTime)}"></span></li>
<li>${#temporals.year(localDateTime)} = <span th:text="${#temporals.year(localDateTime)}"></span></li>
<li>${#temporals.dayOfWeek(localDateTime)} = <span th:text="${#temporals.dayOfWeek(localDateTime)}"></span></li>
<li>${#temporals.dayOfWeekName(localDateTime)} = <span th:text="${#temporals.dayOfWeekName(localDateTime)}"></span></li>
<li>${#temporals.dayOfWeekNameShort(localDateTime)} = <span th:text="${#temporals.dayOfWeekNameShort(localDateTime)}"></span></li>
<li>${#temporals.hour(localDateTime)} = <span th:text="${#temporals.hour(localDateTime)}"></span></li>
<li>${#temporals.minute(localDateTime)} = <span th:text="${#temporals.minute(localDateTime)}"></span></li>
<li>${#temporals.second(localDateTime)} = <span th:text="${#temporals.second(localDateTime)}"></span></li>
<li>${#temporals.nanosecond(localDateTime)} = <span th:text="${#temporals.nanosecond(localDateTime)}"></span></li>
</ul>
</body>
</html>
HTML
복사
•
실행 결과 (http://localhost:8080/basic/date)
5. URL 링크
타임리프에서 URL을 생성할 때는 @{...} 문법을 사용하면 된다.
개요
•
단순한 URL 표현
⇒ @{/hello}
→ /hello
•
쿼리 파라미터를 포함하는 URL 표현
⇒ @{/hello(param1=${param1}, param2=${param2})}
→ /hello?param1=data1¶m2=data2
→ ()에 있는 부분은 쿼리 파라미터로 처리된다.
•
경로 변수
⇒ @{/hello/{param1}/{param2}(param1=${param1}, param2=${param2})}
→ /hello/data1/data2
→ URL 경로상 변수가 있으면 ()는 경로 변수로 처리된다.
•
경로 변수 + 쿼리 파라미터
⇒ @{/hello/{param1}(param1=${param1}, param2=${param2})}
→ /hello/data1?param2=data2
→ 경로 변수와 쿼리 파라미터를 함께 사용할 수 있다.
사용법
•
BasicController - "/link" api 추가
@GetMapping("/link")
public String link(Model model) {
model.addAttribute("param1", "data1");
model.addAttribute("param2", "data2");
return "basic/link";
}
Java
복사
•
basic/link.html
<!DOCTYPE html>
<html xmlns:th="http://www.thymeleaf.org">
<head>
<meta charset="UTF-8">
<title>Title</title>
</head>
<body>
<h1>URL 링크</h1>
<ul>
<li><a th:href="@{/hello}">basic url</a></li>
<li><a th:href="@{/hello(param1=${param1}, param2=${param2})}">hello query param</a></li>
<li><a th:href="@{/hello/{param1}/{param2}(param1=${param1}, param2=${param2})}">path variable</a></li>
<li><a th:href="@{/hello/{param1}(param1=${param1}, param2=${param2})}">path variable + query parameter</a></li>
</ul>
</body>
</html>
HTML
복사
공식 API 문서

리터럴
소스 코드상에서 고정된 값을 리터럴이라 하는데, 사용법과 주의점에 대해 알아보자.
타임리프는 다음과 같은 리터럴이 있다.
•
문자: 'spring'
•
숫자: 10
•
불린: true, false
•
null: null
여기서 문자 리털은 항상 작은 따옴표(')로 감싸줘야 한다.
<span th:text="'text'"></span>
HTML
복사
문자 리터럴에서 공백이 없다면 작은 따옴표를 생략할 수 있다. ⇒룰: A-Z, a-z, 0-9, [], ., -, _
<span th:text="text"></span>
<span th:text="hello world"></span> <!-- 공백이 있기 떄문에 작은 따옴표가 있어야 한다!-->
HTML
복사
사용해보기
•
BasicController - "/literal" api 추가
@GetMapping("/literal")
public String literal(Model model) {
model.addAttribute("data", "Spring!");
return "basic/literal";
}
Java
복사
•
basic/literal.html
<!DOCTYPE html>
<html xmlns:th="http://www.thymeleaf.org">
<head>
<meta charset="UTF-8">
<title>Title</title>
</head>
<body><h1>리터럴</h1>
<ul>
<!--주의! 다음 주석을 풀면 예외가 발생함-->
<!-- <li>"hello world!" = <span th:text="hello world!"></span></li>-->
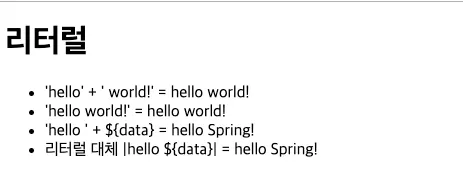
<li>'hello' + ' world!' = <span th:text="'hello' + ' world!'"></span></li>
<li>'hello world!' = <span th:text="'hello world!'"></span></li>
<li>'hello ' + ${data} = <span th:text="'hello ' + ${data}"></span></li>
<li>리터럴 대체 |hello ${data}| = <span th:text="|hello ${data}|"></span></li>
</ul>
</body>
</html>
HTML
복사
⇒ (important) || 을 사용하면 리터럴 대체(Literal substitutions)가 가능해서 백틱(`)을 쓰는 것처럼 사용할 수 있다. (ex: |hello ${data}| → hello Spring)
•
실행 결과
연산
타임리프의 연산은 자바의 연산과 차이점이 없다.
다만 HTML엔티티를 사용하는 부분만 주의해서 사용하면 된다.
연산자 종류
•
비교 연산자
⇒ >(gt), <(lt), >=(ge), <=(le), !(not), ==(eq), ≠(neq, ne)
•
조건식: 자바의 조건식과 유사하다
⇒ [삼항 연산자] (10%2 ==0)?'짝수': '홀수'
•
Elvis 연산자: 조건식의 편의 버전
⇒ ${data}?: defaultValue
•
No-Operation: _인 경우 마치 타임리프가 실행되지 않는 것 처럼 동작한다.
⇒ <p th:text="${nullData}?: _ "> default value </p>
예제
•
BasicController - "/operation" api 추가
@GetMapping("/operation")
public String operation(Model model) {
model.addAttribute("nullData", null);
model.addAttribute("data", "Spring!");
return "basic/operation";
}
Java
복사
•
basic/operation.html
<!DOCTYPE html>
<html xmlns:th="http://www.thymeleaf.org">
<head>
<meta charset="UTF-8">
<title>Title</title>
</head>
<body>
<ul>
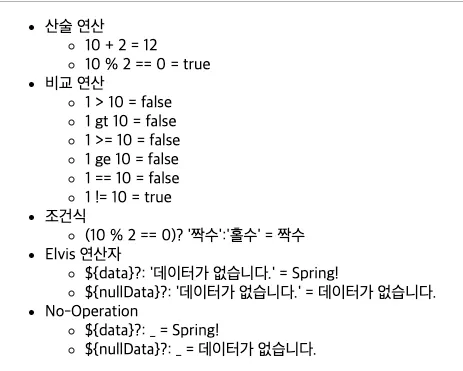
<li>산술 연산
<ul>
<li>10 + 2 = <span th:text="10 + 2"></span></li>
<li>10 % 2 == 0 = <span th:text="10 % 2 == 0"></span></li>
</ul>
</li>
<li>비교 연산
<ul>
<li>1 > 10 = <span th:text="1 > 10"></span></li>
<li>1 gt 10 = <span th:text="1 gt 10"></span></li>
<li>1 >= 10 = <span th:text="1 >= 10"></span></li>
<li>1 ge 10 = <span th:text="1 ge 10"></span></li>
<li>1 == 10 = <span th:text="1 == 10"></span></li>
<li>1 != 10 = <span th:text="1 != 10"></span></li>
</ul>
</li>
<li>조건식
<ul>
<li>(10 % 2 == 0)? '짝수':'홀수' = <span th:text="(10 % 2 == 0)? '짝수':'홀수'"></span></li>
</ul>
</li>
<li>Elvis 연산자
<ul>
<li>${data}?: '데이터가 없습니다.' = <span th:text="${data}?: '데이터가 없습니다.'"></span></li>
<li>${nullData}?: '데이터가 없습니다.' = <span th:text="${nullData}?: '데이터가 없습니다.'"></span></li>
</ul>
</li>
<li>No-Operation
<ul>
<li>${data}?: _ = <span th:text="${data}?: _">데이터가 없습니다.</
span>
</li>
<li>${nullData}?: _ = <span th:text="${nullData}?: _">데이터가 없습니다.</span></li>
</ul>
</li>
</ul>
</body>
</html>
HTML
복사
•
실행 결과
속성 값 설정
HTML 태그에 th:* 속성을 지정하는 방식으로 동작하며 속성이 적용될 경우 기존 속성을 대체하며 기존 속성이 없으면 새로 만든다.
사용법
•
th:attrappend : 속성 값의 값에 값을 추가한다
•
th:attrprepend: 속성 값의 뒤에 값을 추가한다.
•
th:classappend: class 속성에 자연스럽게 추가한다.
예제
•
BasicController - "/attribute" api 추가
@GetMapping("/attribute")
public String attribute() {
return "basic/attribute";
}
Java
복사
•
basic/attribute.html
<!DOCTYPE html>
<html xmlns:th="http://www.thymeleaf.org">
<head>
<meta charset="UTF-8">
<title>Title</title>
</head>
<body>
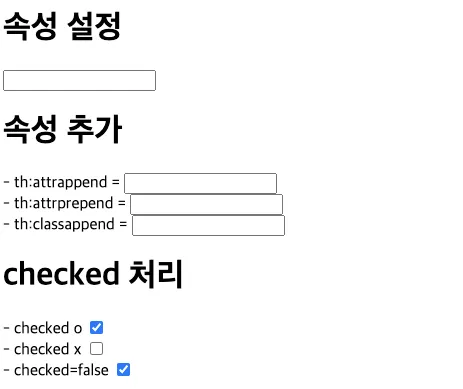
<h1>속성 설정</h1>
<input type="text" name="mock" th:name="userA"/>
<h1>속성 추가</h1>
- th:attrappend = <input type="text" class="text" th:attrappend="class=' large'"/><br/>
- th:attrprepend = <input type="text" class="text" th:attrprepend="class='large '"/><br/>
- th:classappend = <input type="text" class="text" th:classappend="large"/><br/>
<h1>checked 처리</h1>
- checked o <input type="checkbox" name="active" th:checked="true"/><br/>
- checked x <input type="checkbox" name="active" th:checked="false"/><br/>
- checked=false <input type="checkbox" name="active" checked="false"/><br/>
</body>
</html>
HTML
복사
⇒ HTML에서는 check=false도 속성이 있기 때문에 checked 처리가 되버린다. (true, false는 상관없다.)
⇒ 타임리프의 th:checked는 값이 False면 속성자체를 추가하지 않기 때문에 사용이 편하다.
- 렌더링 전
<input type="checkbox" name="active" th:checked="false"/><br/>
- 렌더링 후
<input type="checkbox" name="active" /><br/>
HTML
복사
•
실행 결과
반복
•
타임리프에서 반복은 th:each를 사용한다.
•
java.util.Enumeration, java.util.Iterble을 구현한 모든 객체는 해당 태그를 사용해서 반복할 수 있다.
•
Map은 Map.Entry가 반복된다.
사용법
•
기본적인 사용법
<tr th:each="아이템 : ${반복할리스트}">
<td th:text="${아이템.프로퍼티1}">default value</td>
<td th:text="${아이템.프로퍼티2}">default value</td>
</tr>
HTML
복사
•
선택 변수 표현식을 사용하는 법
<tr th:each="아이템 : ${반복할리스트}" th:object="${아이템}">
<td th:text="*{프로퍼티1}">default value</td>
<td th:text="*{아이템로퍼티2}">default value</td>
</tr>
HTML
복사
참고: 반복자의 상태확인
th:each로 반복을 할 때 반복하는 현재의 상태(ex: 전체사이즈, 홀수/짝수 여부, 처음/마지막 여부 등) 을 확인할수도 있다.
th:each="아이템 : ${반복할리스트}" 으로 반복을 한다고 했는데, 이 상태에서 상태를 확인하고자 한다면 관례상 지정한 변수명(아이템) + Stat인 아이템Stat으로 상태값 접근이 가능하다.
예를들어 th:each="item : ${list}" 라면 itemStat.size로 전체 크기에 접근할 수 있다.
또한, 관례가 아닌 나만의 변수명으로 상태 접근을 하고 싶다면 다음과 같이 두 번째 파라미터로 명시하면 된다.
<tr th:each="user, customStat : ${users}">
HTML
복사
예제
•
BasicController - "/each" api 추가
@GetMapping("/each")
public String each(Model model) {
addUsers(model);
return "basic/each";
}
private void addUsers(Model model) {
List<User> users = Arrays.asList(new User("userA", 10),
new User("userB", 20),
new User("userC", 30));
model.addAttribute("users", users);
}
Java
복사
•
basic/each.html
<!DOCTYPE html>
<html xmlns:th="http://www.thymeleaf.org">
<head>
<meta charset="UTF-8">
<title>Title</title>
</head>
<body>
<h1>기본 테이블</h1>
<table border="1">
<tr>
<th>username</th>
<th>age</th>
</tr>
<tr th:each="user : ${users}">
<td th:text="${user.username}">username</td>
<td th:text="${user.age}">0</td>
</tr>
</table>
<h1>반복 상태 유지</h1>
<table border="1">
<tr>
<th>count</th>
<th>username</th>
<th>age</th>
<th>etc</th>
</tr>
<tr th:each="user, userStat : ${users}">
<td th:text="${userStat.count}">username</td>
<td th:text="${user.username}">username</td>
<td th:text="${user.age}">0</td>
<td>
index = <span th:text="${userStat.index}"></span>
count = <span th:text="${userStat.count}"></span>
size = <span th:text="${userStat.size}"></span>
even? = <span th:text="${userStat.even}"></span>
odd? = <span th:text="${userStat.odd}"></span>
first? = <span th:text="${userStat.first}"></span>
last? = <span th:text="${userStat.last}"></span>
current = <span th:text="${userStat.current}"></span>
</td>
</tr>
</table>
<h1>선택 변수 표현식을 사용한 반복</h1>
<table border="1">
<tr>
<th>count</th>
<th>username</th>
<th>age</th>
<th>etc</th>
</tr>
<tr th:each="user : ${users}" th:object="${user}">
<td th:text="${userStat.count}">username</td>
<td th:text="*{username}">username</td>
<td th:text="*{age}">0</td>
<td>
index = <span th:text="${userStat.index}"></span>
count = <span th:text="${userStat.count}"></span>
size = <span th:text="${userStat.size}"></span>
even? = <span th:text="${userStat.even}"></span>
odd? = <span th:text="${userStat.odd}"></span>
first? = <span th:text="${userStat.first}"></span>
last? = <span th:text="${userStat.last}"></span>
current = <span th:text="${userStat.current}"></span>
</td>
</tr>
</table>
</body>
</html>
HTML
복사
조건부 평가
타임리프에서 조건식은 다음과 같이 사용할 수 있으며 조건에 해당되지 않으면 태그자체가 렌더링 되지 않는다.
•
if문과 unless(not if) 문
◦
th:if="조건식"
◦
th:unless="조건식"
•
switch-case문
<div th:switch="${조건대상 변수}">
<span th:case="비교변수1">value1</span>
<span th:case="비교변수2">value2</span>
<span th:case="*">default</span>
</div>
HTML
복사
예제
•
BasicController - "/condition" api 추가
@GetMapping("/condition")
public String condition(Model model) {
addUsers(model);
return "basic/condition";
}
//위에서 작성했던 메서드니 중복에 유의하자
private void addUsers(Model model) {
List<User> users = Arrays.asList(new User("userA", 10),
new User("userB", 20),
new User("userC", 30));
model.addAttribute("users", users);
}
Java
복사
•
basic/condition.html
<!DOCTYPE html>
<html xmlns:th="http://www.thymeleaf.org">
<head>
<meta charset="UTF-8">
<title>Title</title>
</head>
<body>
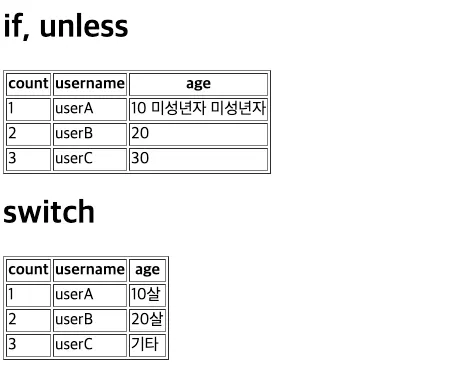
<h1>if, unless</h1>
<table border="1">
<tr>
<th>count</th>
<th>username</th>
<th>age</th>
</tr>
<tr th:each="user, userStat : ${users}">
<td th:text="${userStat.count}">1</td>
<td th:text="${user.username}">username</td>
<td>
<span th:text="${user.age}">0</span>
<span th:text="'미성년자'" th:if="${user.age lt 20}"></span>
<span th:text="'미성년자'" th:unless="${user.age ge 20}"></span>
</td>
</tr>
</table>
<h1>switch</h1>
<table border="1">
<tr>
<th>count</th>
<th>username</th>
<th>age</th>
</tr>
<tr th:each="user, userStat : ${users}">
<td th:text="${userStat.count}">1</td>
<td th:text="${user.username}">username</td>
<td th:switch="${user.age}">
<span th:case="10">10살</span> <span th:case="20">20살</span> <span th:case="*">기타</span>
</td>
</tr>
</table>
</body>
</html>
HTML
복사
•
실행 결과
주석
HTML및 타임리프에서 주석을 사용하는 방법은 비슷하지만 결과가 조금 다르다.
주석의 종류
1.
표준 HTML 주석: 우리가 알고 있는 HTML 에서 사용하는 기본적인 주석이다.
•
Format: <!— contents —>
•
예시
<!-- <span th:text="${data}">html data</span> -->
HTML
복사
2.
타임리프 파서 주석: 타임리프에 적용되는 주석으로 해당 주석 내용은 렌더링에서 주석 부분이 제거된다.
•
Format
⇒ 한 줄인 경우: <!—/* contents */—>
⇒ 여러줄인경우: <!—/*—> \n contents \n <!—/*—>
•
예시
<h1>2. 타임리프 파서 주석</h1>
<!--/* [[${data}]] */-->
<!--/*-->
<span th:text="${data}">html data</span>
<!--*/-->
HTML
복사
3.
타임리프 프로토타입 주석: HTML 파일을 그대로 열면 렌더링되지 않고 타임리프를 렌더링 한경우에만 보이는 주석
•
Format: <!—/*/ contents /*/—>
•
예시
<!--/*/
<span th:text="${data}">html data</span>
/*/-->
HTML
복사
예제
•
BasicController - "/comments" api 추가
@GetMapping("/comments")
public String comments(Model model) {
model.addAttribute("data", "Spring!");
return "basic/comments";
}
Java
복사
•
basic/comments.html
<!DOCTYPE html>
<html xmlns:th="http://www.thymeleaf.org">
<head>
<meta charset="UTF-8">
<title>Title</title>
</head>
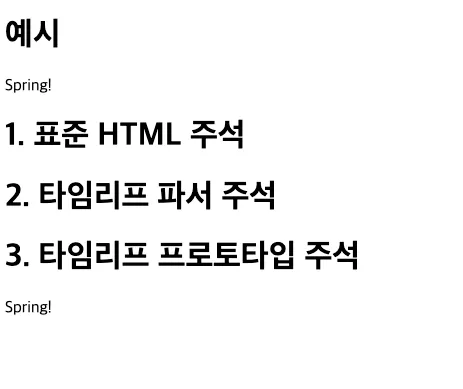
<body> <h1>예시</h1>
<span th:text="${data}">html data</span>
<h1>1. 표준 HTML 주석</h1>
<!--
<span th:text="${data}">html data</span>
-->
<h1>2. 타임리프 파서 주석</h1>
<!--/* [[${data}]] */-->
<!--/*-->
<span th:text="${data}">html data</span>
<!--*/-->
<h1>3. 타임리프 프로토타입 주석</h1>
<!--/*/
<span th:text="${data}">html data</span>
/*/-->
</body>
</html>
HTML
복사
•
실행 결과
◦
HTML을 바로 열었을 경우
◦
타임리프를 통해 렌더링해서 열었을 경우 (http://localhost:8088/basic/comments)
블록
타임리프의 유일한 자체태그인 <th:block> 는 렌더링시 제거되는 태그이며 타임리프의 속성을 사용하기 애매한 경우 사용된다.
대표적으로 th:each로 반복을 하고자 할때 반복의 대상이 한 요소가 아니라 동등한 레벨의 여러 요소를 구룹화하여 반복하고자 하면 th:block이 유용하다.
예제
•
BasicController - "/block" api 추가
@GetMapping("/bloco")
public String block(Model model) {
addUsers(model);
return "basic/block";
}
Java
복사
•
basic/block.html
<!DOCTYPE html>
<html xmlns:th="http://www.thymeleaf.org">
<head>
<meta charset="UTF-8">
<title>Title</title>
</head>
<body>
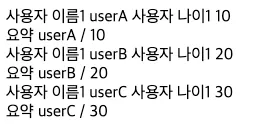
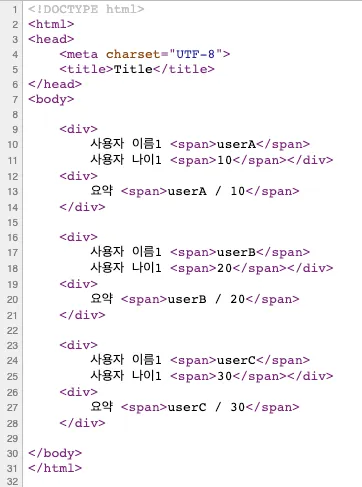
<th:block th:each="user : ${users}">
<div>
사용자 이름1 <span th:text="${user.username}"></span>
사용자 나이1 <span th:text="${user.age}"></span></div>
<div>
요약 <span th:text="${user.username} + ' / ' + ${user.age}"></span>
</div>
</th:block>
</body>
</html>
HTML
복사
•
실행 결과
자바스크립트 인라인
개인적으로 기존 내용들은 대부분 아는 내용이라 감흥이 없었는데, 타임리프의 자바스크립트 인라인 기능은 이번 강의에서 처음알게되었고 앞으로 자주 쓰게 될 것 같다.
해당 속성은 타임리프가 자바스크립트를 편리하게 사용할 수 있도록 도와주는 자바스크립트 인라인 기능을 제공하는데, 간단하게 <script th:inline="javascript"> 로 가능하다.
이 기능을 모르고 쓸 때 타임리프에서 객체 혹은 리스트를 자바스크립트 변수에 담거나 JSON화 시키기위해서는 몹시 까다로운 우회가 필요했다.
다음 코드는 자바스크립트 인라인을 사용하지 않고 작성한 코드다.
<!-- user정보는 User(username= "userA", age=10) 이라 가정한다 -->
<script>
var username = [[${user.username}]];
var age = [[${user.age}]];
//자바스크립트 내추럴 템플릿
var username2 = /*[[${user.username}]]*/ "test username";
//객체
var user = [[${user}]];
</script>
HTML
복사
어떤 에러가 발생할까? 하나씩 살펴보자.
•
var username = [[${user.username}]]; ⇒ var username = userA
: userA는 문자열인데 작은따옴표(혹은 큰따옴표)가 없기에 오류가 날 것이다.
•
var user = [[${user}]]; ⇒ var user = BasicController.User(username=userA, age=10);
: 객체의 경우 그냥 문자열로 들어가기에 JSON 타입도아니고 분리해서 파싱하기도 까다롭다.
사실 첫 번째 에러는 그냥 '[[${user.username}]]' 이런식으로 번거롭지만 따옴표를 붙혀서 처리할수 있다.
하지만, 두 번째 문제는 객체를 그대로 저장하고 싶을 경우인데 이 경우 자바스크립트인라인을 쓰지 않고 사용하기위해서는 (아마도) 다음 두 가지 방법을 사용해야 한다.
1.
서버에서 JSON화 된 속성을 만들어서 추가한다.
⇒ 서버측에서 User 객체를 ObjectMapper를 이용해 JSON으로 만들어 반환
String userD = om.writeValueAsString(new User("userD", 30));
model.addAttribute("userD", userD);
Java
복사
<script>
var user2 = [(${userD})];
</script>
HTML
복사
2.
javascript에서 프로퍼티를 하나하나 꺼내어 JSON구현
<script>
//객체 프로퍼티를 꺼내서 객체화
var user3 = {
username: '[[${user.username}]]',
age: [[${user.age}]]
}
</script>
HTML
복사
두 방법 모두 몹시 번거롭고 신경써야할 곳이 많다. User객체가 프로퍼티가 2개이기에 짧게 끝났지만 필드가 늘어날수록 신경쓸 부분이 늘어나고 그만큼 오류가 발생할 확률도 높아진다.
이번에는 자바스크립트 인라인을 이용해서 어떻게 간편하게 사용이 가능해지는지 확인해보자.
예제
•
BasicController - "/javascript" api 추가
@GetMapping("/javascript")
public String javascript(Model model) throws JsonProcessingException {
model.addAttribute("user", new User("userA", 10));
addUsers(model);
return "basic/javascript";
}
Java
복사
•
basic/javascript.html
<!DOCTYPE html>
<html xmlns:th="http://www.thymeleaf.org">
<head>
<meta charset="UTF-8">
<title>Title</title>
</head>
<body>
<!-- 자바스크립트 인라인 사용 후 -->
<script th:inline="javascript">
var username = [[${user.username}]];
var age = [[${user.age}]];
//자바스크립트 내추럴 템플릿
var username2 = /*[[${user.username}]]*/ "test username";
//객체
var user = [[${user}]];
</script>
</body>
</html>
HTML
복사
⇒ 결과창 - 소스코드 보기
<script>
var username = "userA";
var age = 10;
//자바스크립트 내추럴 템플릿
var username2 = "userA";
//객체
var user = {"username":"userA","age":10};
</script>
HTML
복사
자바스크립트 인라인을 붙혔을 경우 편리해진 부분은 다음과 같다.
•
문자열에는 자동으로 따옴표를 붙혀준다.
•
객체는 자동으로 JSON으로 만들어준다.
⇒ 인라인 사용 전은 객체의 toString()이 호출된 것이다.
⇒ 인라인 사용 후는 객체를 JSON으로 변환해준다.
•
자바스크립트에서 문제가 될 수 있는 문자가 있으면 이스케이프 처리도 해준다(ex: " → \")
•
HTML에서 바로 여는경우와 타임리프에서 렌더링하는 경우 둘 다 문제없이 값을 넣을 수 있다.
인라인 전에는 내추럴 템플릿 기능이 적용하지 않고 렌더링 내용을 주석처리한다. 그리고 반대로 인라인 후에는 내추럴 템플릿 기능이 동작하여 주석 부분이 사라지고 내용이 적용된다.
→ var username2 = /*[[${user.username}]]*/ "test username";
→ 인라인 사용 전: var username2 = /*userA*/ "test username";
→ 인라인 사용 후: var username2 = "userA";
자바스크립트 인라인 each
자바스크립트 인라인은 each를 지원하며 사용하는 방법도 th:each와 유사하다.
<script th:inline="javascript">
[# th:each="user, stat : ${users}"]
var user[[${stat.count}]] = [[${user}]];
[/]
</script>
HTML
복사
템플릿 조각
•
공통부분을 템플릿화 하여 필요한 부분에서 해당 템플릿을 불러와 설정하는 기능
⇒ Ex: 좌측 카테고리영역, 상단 영역, 하단 영역 등 공통으로 사용되는 영역을 모듈화 시킨다.
사용법
1.
템플릿 으로 사용할 공통 태그 만들기
<!DOCTYPE html>
<html xmlns:th="http://www.thymeleaf.org">
<body>
<footer th:fragment="copy"> 푸터 자리 입니다.
</footer>
<footer th:fragment="copyParam (param1, param2)">
<p>파라미터 자리 입니다.</p>
<p th:text="${param1}"></p>
<p th:text="${param2}"></p>
</footer>
</body>
</html>
HTML
복사
⇒ th:frament="name" 해당 태그로 선언된 태그 내부가 템플릿이 되며 속성명이 템플릿 조각 이름이 된다. 해당 템플릿 조각을 사용하고싶은 다른 영역에서 해당 이름을 사용해 템플릿을 가져올 수 있다.
⇒ 파라미터도 전달을 해 줄 수 있다. fragment 속성명에 (param1, param2)처럼 파라미터를 넣어줄 수 있는데, 이 파라미터는 템플릿 조각 내에서 사용할 수 있다. 사용법은 기존에 사용하던 attribute와 동일하다.
2.
템플릿 조각 사용해보기
<!DOCTYPE html>
<html xmlns:th="http://www.thymeleaf.org">
<head>
<meta charset="UTF-8">
<title>Title</title>
</head>
<body>
<h1>부분 포함</h1>
<h2>부분 포함 insert</h2>
<div th:insert="~{template/fragment/footer :: copy}"></div>
<h2>부분 포함 replace</h2>
<div th:replace="~{template/fragment/footer :: copy}"></div>
<h2>부분 포함 단순 표현식</h2>
<div th:replace="template/fragment/footer :: copy"></div>
<h1>파라미터 사용</h1>
<div th:replace="~{template/fragment/footer :: copyParam ('데이터1', '데이터 2')}"></div>
</body>
</html>
HTML
복사
•
th:insert="~{template/fragment/footer :: copy}"
: footer라는 파일에 있는 fragment중 이름이 copy인 템플릿을 가져와 안에 주입해준다(insert)
⇒ 주입 결과는 다음과 같다.
<h2>부분 포함 insert</h2>
<div>
<footer> 푸터 자리 입니다.</footer>
</div>
HTML
복사
•
th:replace="~{template/fragment/footer :: copy}"
: footer라는 파일에 있는 fragment중 이름이 copy인 템플릿을 가져와 해당 태그와 교체한다.
⇒ 교체 결과는 다음과 같다.
<h2>부분 포함 replace</h2>
<footer> 푸터 자리 입니다.</footer>
HTML
복사
•
th:replace="template/fragment/footer :: copy"
: 부분 포함 단순 표현식으로 원래는 ~{...} 을 사용해야하지만 경로가 단순하면 생략할 수 있다.
•
th:replace="~{template/fragment/footer :: copyParam ('데이터1', '데이터 2')}"
: 만약 해당 템플릿에 파라미터를 추가하고싶으면 이런식으로 사용하면 된다.
⇒ 결과화면
<h1>파라미터 사용</h1>
<footer>
<p>파라미터 자리 입니다.</p>
<p>데이터1</p>
<p>데이터 2</p>
</footer>
HTML
복사
정리
•
공통된 부분을 하나의 템플릿으로 만들어 사용할 수 있다.
•
th:fragment="이름" 속성을 추가하면 템플릿이 되며 다른곳에서 이름으로 사용할 수 있다.
•
th:insert, th:replace로 템플릿을 사용할 수 있다.
•
기본적으로 조각표현식(~{...})을 사용해야하지만 표현이 간단하면 생략이 가능하다.
•
파라미터는 (param, ...) 방식으로 사용 가능하다.
⇒ th:replace="~{template/fragment/footer :: copyParam ('데이터1', '데이터 2')}"
템플릿 레이아웃1
th:fragment, th:replace, th:insert를 통해 템플릿을 불러와 주입 혹은 교체하는 경험을 해봤을 것이다. (위의 챕터를 따라했다면 말이다....)
템플릿은 이전 챕터처럼 기본적인 주입과 교체말고도 더욱 더 다양한 사용법을 제공하는데, 그 중하나를 다뤄볼 것인데, 이번에는 코드 조각을 레이아웃에 넘겨서 사용하는 방법에 대해 알아 볼 것이다.
쉽게 말하자면 단순히 변수만 파라미터로 넘겨주는게아니라 태그 자체를 단수 혹은 복수로 넘겨줘서 템플릿을 완성해서 사용할 수 있다는 의미다.
해당 기능을 사용하면 무엇이 좋은지 우선 다음 코드를 보자.
<html xmlns:th="http://www.thymeleaf.org">
<head th:fragment="head">
<title>타이틀</title>
<link rel="stylesheet" type="text/css" media="all" th:href="@{/css/ awesomeapp.css}">
<script type="text/javascript" th:src="@{/sh/scripts/codebase.js}"></script>
</head>
HTML
복사
정말 단순한 상단영역 템플릿이다. 이제 이를 사용해서 다른 문서의 헤더부분을 추가할 수 있다.
하지만 문제가 있다. 모든 html 문서에서 타이틀을 동일한 이름으로 사용하고 싶을까? 그렇지 않다.
예를들어 게시판만 하더라도 자유게시판, 공지사항, QnA, 기타 등등 여러 게시판이 있고 title도 그에 맞춰 바꾸고 싶을것이다. 추가로 css, javascript도 각 게시판별로 바꾸거나 추가하고싶을 수 있다. 이런 경우 기본적인 템플릿 조각 사용으로는 한계가 있다.
코드 조각을 레이아웃으로!
그래서 다음과 같은 기능을 제공하며 해당 기능을 사용하여 내가 커스텀을 원하는 기능들을 변경할 수 있다.
<html xmlns:th="http://www.thymeleaf.org">
<head th:fragment="common_header(title,links)">
<title th:replace="${title}">레이아웃 타이틀</title>
<!-- 공통 -->
<link rel="stylesheet" type="text/css" media="all" th:href="@{/css/ awesomeapp.css}">
<link rel="shortcut icon" th:href="@{/images/favicon.ico}">
<script type="text/javascript" th:src="@{/sh/scripts/codebase.js}"></script>
<!-- 추가 -->
<th:block th:replace="${links}"/>
</head>
HTML
복사
base.html
<!DOCTYPE html>
<html xmlns:th="http://www.thymeleaf.org">
<head th:replace="template/layout/base :: common_header(~{::title},~{::link})">
<title>메인 타이틀</title>
<link rel="stylesheet" th:href="@{/css/bootstrap.min.css}">
<link rel="stylesheet" th:href="@{/themes/smoothness/jquery-ui.css}">
</head>
<body> 메인 컨텐츠</body>
</html>
HTML
복사
layoutMain.html
•
common_header(~{::title},~{::link})
◦
::title은 현재 페이지의 title 태그를 파라미터로 전달한다.
◦
::link는 현재 페이지의 link 태그들을 전달한다.
•
<title th:replace="${title}">레이아웃 타이틀</title>
◦
파라미터로 전달받은 title태그로 교체한다.
•
<th:block th:replace="${links}"/>
◦
파라미터로 전달받은 links 태그로 교체하는데 하나가 아니라 여러개여도 모두 전달된다.
head가아니라 더 넓은 범위의 레이아웃도 사용할 수 있을까?
충분히 가능하다. 사용법은 동일하며
템플릿 레이아웃은 head 뿐아니라 html에서도 쓸 수 있다. 즉 더 확장할 수 있다는 것이다.
사용법은 그저 th:replace 속성의 위치를 html에 두면 된다.
예제
•
layoutFile.html
<!DOCTYPE html>
<html th:fragment="layout (title, content)" xmlns:th="http://www.thymeleaf.org">
<head>
<title th:replace="${title}">레이아웃 타이틀</title>
</head>
<body>
<h1>레이아웃 H1</h1>
<div th:replace="${content}">
<p>레이아웃 컨텐츠</p>
</div>
<footer> 레이아웃 푸터</footer>
</body>
</html>
HTML
복사
•
layoutExtendMain.html
<!DOCTYPE html>
<html th:replace="~{template/layoutExtend/layoutFile :: layout(~{::title}, ~{::section})}"
xmlns:th="http://www.thymeleaf.org">
<head>
<title>메인 페이지 타이틀</title></head>
<body>
<section>
<p>메인 페이지 컨텐츠</p>
<div>메인 페이지 포함 내용</div>
</section>
</body>
</html>
HTML
복사
•
실행 결과

•
실행 결과 ( 페이지 소스 코드 보기)
<!DOCTYPE html>
<html>
<head>
<title>메인 페이지 타이틀</title>
</head>
<body>
<h1>레이아웃 H1</h1>
<section>
<p>메인 페이지 컨텐츠</p>
<div>메인 페이지 포함 내용</div>
</section>
<footer> 레이아웃 푸터</footer>
</body>
</html>
HTML
복사
⇒ layoutExtendMain.html 에서 작성한 title과 section 부분이 layoutFile.html에 교체되서 들어간 결과를 확인할 수 있다.