
목차
자바에서의 입출력
1. 입출력(I/O) 이란?
•
Input & Output
•
컴퓨터 내부 또는 외부의 장치와 프로그램간에 데이터를 주고받는 것
2. 스트림(stream)
•
입출력(I/O)을 하기 위해 필요한 데이터 운반 연결 통로
•
연속적인 데이터의 흐름을 물(stream)에 비유해 붙혀진 이름이다.
•
단방향통신만을 지원하기 때문에 입력과 출력을 동시에 수행해야 하는경우 두 개의 스트림이 필요하다.
⇒ 입력 스트림(input stream), 출력 스트림(output stream)
•
Queue 구조로 되어있다. (FIFO)
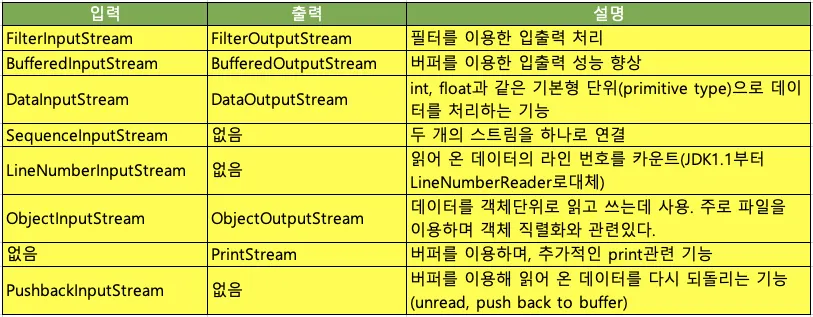
바이트기반 스트림
•
데이터를 바이트(byte)단위로 주고받으며 입출력 대상에 따라 다음과 같은 입출력 스트림을 제공한다.

•
이런 여러 입출력 스트림 구현체들은 다음과 같은 인터페이스 API를 구현한다.

⇒ read의 반환타입이 int인 이유는 read의 반환값의 범위가 0~255와 -1이기 때문이다.
⇒ read메서드에서 입력스트림으로부터 1 byte를 읽을 수 없으면 -1을 반환한다.
⇒ read(byte[] b, int off, int len)은 len개의 byte를 읽어서 byte배열 b의 off위치부터 저장한다는 의미.
⇒ read(byte[] b)는 내부적으로 read(byte[] b, int off, int len)을 호출한다.
바이트기반의 보조 스트림
•
바이트기반 스트림의 기능을 향상시키거나 추가및 보완하기 위해 제공되는 보조 스트림
•
보조 스트림이기에 스트림을 먼저 생성한 다음 이를 이용해 보조 스트림을 생성해야 한다.
FileInputStream fis = new FileInputStream("test.txt");
BufferedInputStream bis = new BufferedInputStream(fis);
bis.read();
Java
복사
⇒ 기반스트림(FileInputStream)을 먼저 만든 뒤 이를 이용해 보조스트림(BufferedInputStream)을 만든다.
⇒ FilterInputStream은 InputStream클래스의 모든 메소드를 오버라이드 하는 보조스트림.
⇒ 이를 확장한 스트림이 BufferedInputStream
바이트기반 스트림 상세
1. InputStream, OutputStream
두 인터페이스는 모든 바이트기반 스트림의 조상 클래스로 다음과 같은 메서드가 존재한다.
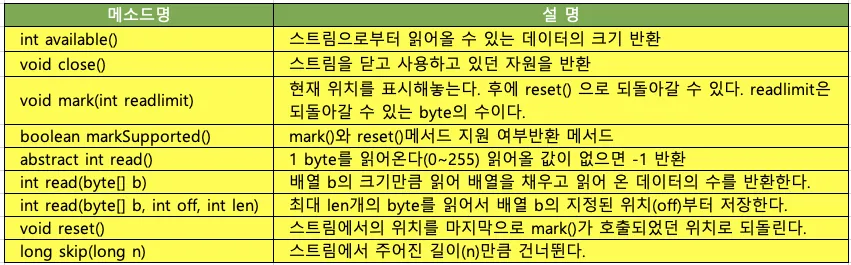
InputStream 메소드

outputStream 메소드
해당 메서드를 보며 기능이 확장된 보조스트림 클래스도 사용할 수 있다.
2. ByteArrayInputStream, ByteArrayOutputStream
•
바이트 배열(byte[])에 데이터를 입출력하는 바이트기반 스트림
•
데이터를 임시로 바이트배열에 담아 변환 작업을 하는데 사용된다.
•
자주 사용되는 스트림은 아니다.
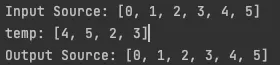
public static void main(String[] args) throws IOException {
byte[] inSrc = {0, 1, 2, 3, 4, 5};
byte[] outSrc = null;
byte[] temp = new byte[4];
ByteArrayInputStream input = new ByteArrayInputStream(inSrc);
ByteArrayOutputStream output = new ByteArrayOutputStream();
try {
while (input.available() > 0) {
int len = input.read(temp);
output.write(temp, 0, len);
}
} catch (IOException ie) {
}
outSrc = output.toByteArray();
System.out.println("Input Source: " + Arrays.toString(inSrc));
System.out.println("temp: " + Arrays.toString(temp));
System.out.println("Output Source: " + Arrays.toString(outSrc));
}
Java
복사
•
실행 결과
•
 어째서 temp에 [4, 5, 2, 3]이 출력된 것일까?
 ⇒ temp에 남아있던것을 지우고 쓰는게아니라 덮어쓰기(overwrite)때문이다.
⇒ 이런 경우때문에, 길이를 지정하지 않고 write를 하다보면 문제의 발생요지가 있다.
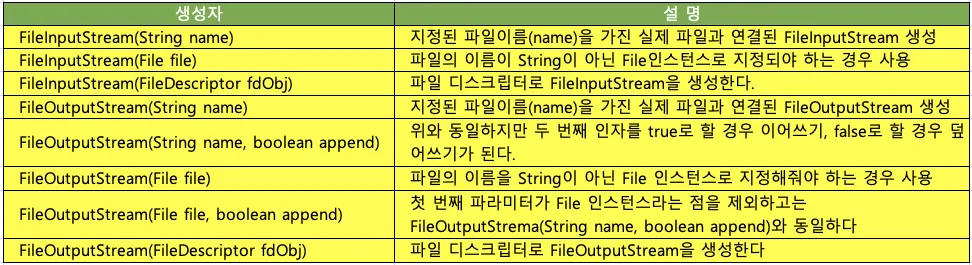
3. FileInputStrem, FileOutputStream
•
파일(file)에 데이터를 입출력하는 바이트기반 스트림
public static void main(String[] args){
int data = 0;
try(FileInputStream fis1 = new FileInputStream(PATH + "test1.txt");
FileOutputStream fos1 = new FileOutputStream(PATH + "testOut1.txt")){
while ((data = fis1.read()) != -1) {
fos1.write(data);
}
}catch(IOException ie){
ie.printStackTrace();
}
}
Java
복사
⇒ 지정한 위치에 있는 test1.txt텍스트 파일을 읽어서 testOut1.txt로 복사하는 코드다.
⇒ try-with-resources를 사용해 따로 close메서드를 명시할 필요는 없다.
바이트기반 보조 스트림 상세
1. FilterInputStream, FilterOutputStream
•
모든 보조 스트림의 최고 조상 클래스
•
보조스트림은 자체적으로 입출력을 수행할 수 없기에 기반 스트림을 필요로 한다.
•
FilterXxxxStream은 기반 스트림의 모든 메서드를 그대로 호출할 뿐으로 자체적으로는 로직이 없다.
•
상속을 통해 원하는 작업을 수행하도록 오버라이딩이 필요하다.
•
FileInputStream(InputStream)의 생성자는 protected이다.
⇒ 상속을 통해 오버라이딩 되야한다는 의미.
•
FilterXxxxStream을 상속받아 기반스트림에 보조 기능을 추가한 보조스트림
◦
FilterInputStream의 자손: BufferedInputStream, DataInputStream, PushbackInputStream...
◦
FilterOutputStream의 자손: BufferedOutputStream, DataOutputStream, PrintStream ...
2. BufferedInputStream, BufferedOutputStream
•
스트림의 입출력 효율을 높히기 위해 버퍼를 사용하는 보조스트림
•
한 바이트씩 입출력하는게 아니라 버퍼(바이트 배열)를 이용해 한 번에 여러 바이트를 입출력한다.
•
바이트 단위가 아닌 버퍼단위로 읽기 때문에 속도 부분에서 월등하고 그렇기에 더 자주 쓰인다.
•
BufferedOutputStream은 write를 이용한 출력이 버퍼에 저장되는데, 가득 찰 때만 출력소스에 출력된다.
⇒ 마지막 출력 부분이 가득차지 못 한 상태로 저장되면 버퍼에 남아있는채로 종료될 수 있다.
⇒ close()나 flush()를 호출해서 버퍼의 남아있는 내용을 모두 출력소스에 출력되도록 해야 한다.
•
보조 스트림을 닫으면 기반 스트림도 같이 닫힌다.

BufferedInputStream 생성자
BufferedOutputStream 생성자와 메소드
3. DataInputStream, DataOutputStream
•
기본형 단위로 읽고 쓰는 보조스트림
•
데이터 입출력을 바이트 단위가 아니라 기본 자료형의 단위로 입출력 할 수 있다.
•
각 기본 자료형 값을 16진수로 표현해 저장한다.
⇒ Ex: int 값을 출력할 경우 4byte의 16진수로 출력된다.
•
각 자료형의 크기가 다르기에 입출력시 순서에 주의해야 한다.
DataInputStream의 생성자와 메서드
DataOutputStream의 생성자와 메서드
해당 보조 스트림을 사용해 출력소스에 출력을 하면 어떤 결과가 나올까?
•
App.java
public static void main(String[] args){
try(FileOutputStream fis = new FileOutputStream(PATH + "testOut1.txt");
DataOutputStream dos = new DataOutputStream(fis)){
dos.writeInt(10);
dos.writeFloat(20.0f);
dos.writeBoolean(true);
}catch(IOException ie){
ie.printStackTrace();
}
}
Java
복사
•
testOut1.txt
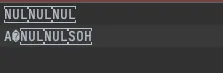
뭔가 알 수 없는 문자가 저장되있는데 이는 출력소스에 출력을 할 때 이진 데이터(binary data)로 저장되는데 문자 데이터(text data)가 아니기 때문에 그렇다. 파일을 16진수 코드로 볼 수 있는 UltraEdiy과 같은 프로그램이나 ByteArrayOutputStream을 사용하면 확인이 가능하다.
try (ByteArrayOutputStream bos = new ByteArrayOutputStream();
DataOutputStream dos = new DataOutputStream(bos)) {
dos.writeInt(10);
dos.writeFloat(20.0f);
dos.writeBoolean(true);
byte[] bytes = bos.toByteArray();
String[] hex = new String[bytes.length];
for (int i = 0; i < bytes.length; i++) {
hex[i] = bytes[i] < 0
? String.format("%02x", bytes[i] + 256)
: String.format("%02x", bytes[i]);
}
System.out.println("10진수: " + Arrays.toString(bytes));
System.out.println("16진수: " + Arrays.toString(hex));
} catch (IOException ie) {
ie.printStackTrace();
}
Java
복사
•
실행 결과

•
10진수 결과를 4 byte씩 나눠보면 [0, 0, 0, 10] writeInt(10)에 의해 출력된 값이다. 그리고 두 번째 4byte인 [65, -96, 0, 0]은 writeFloat(20.0f)에 의해 출력된 것이다.
마지막으로 1 byte인 1은 writeBoolean(true)에 의해 출력된 것이다.
참고: byte배열로 값을 받는경우 상황에 따라 0~255범위의 값으로 변환해야 한다. (Byte의 표현 범위는 -127 ~ 128 이기 때문이다.)
이렇게 생성된 파일을 다시 읽어서 출력하거나 다른 형태로 저장하는 것 역시 가능하다.
try (FileInputStream fis = new FileInputStream(PATH + "source.txt");
DataInputStream dis = new DataInputStream(fis)) {
int intValue = dis.readInt();
float floatValue = dis.readFloat();
boolean boolValue = dis.readBoolean();
System.out.println("intValue = " + intValue); // 10
System.out.println("floatValue = " + floatValue); // 20.0
System.out.println("boolValue = " + boolValue); // true
} catch (IOException ie) {
ie.printStackTrace();
}
Java
복사
4. SequenceInputStream
•
여러 입력 스트림을 연결해서 하나의 스트림으로 다룰 수 있도록 해주는 보조 스트림
•
다른 보조스트림과 다르게 FilterInputStream이 아닌 InputStream을 바로 구현한다.

SequenceInputStream의 생성자
사용하는 방법은 딱히 어렵거나 하지 않고 그저 생성자를 통해 연결할 스트림들을 넣어주면 된다.
try(FileInputStream fis1 = new FileInputStream(PATH + "file1.txt");
FileInputStream fis2 = new FileInputStream(PATH + "file2.txt");
SequenceInputStream sis = new SequenceInputStream(fis1, fis2);
FileOutputStream fos = new FileOutputStream(PATH + "outFile.txt");
BufferedOutputStream out = new BufferedOutputStream(fos)){
int data = 0;
while ((data = sis.read()) != -1) {
out.write(data);
}
}catch(IOException ie){
}
Java
복사
⇒ 두 스트림이 이어졌기 때문에 하나의 스트림이 끝나면 다음 스트림이 남았더라도 끝난 시점에서는 available 메서드는 끝난다는의미의 0을 반환한다. 그렇기 때문에 반복할 때 available로 검사를 할 경우 제대로 반복이 되지 않는다.
5. printStream
•
데이터를 다양한 형식의 문자로 출력하는 기능을 제공하는 보조스트림
•
System.out과 System.err이 PrintStream 이다
•
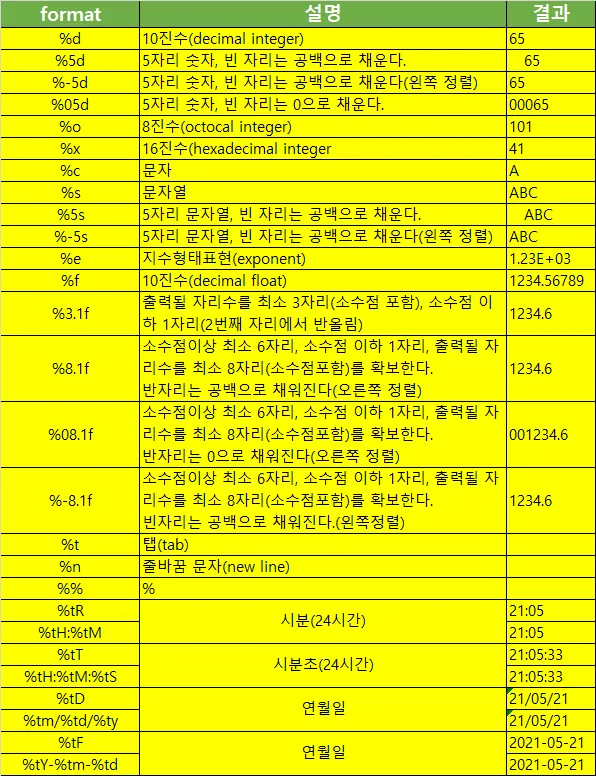
줄바꿈 문자를 출력함으로써 줄을 바꿔주는 println()과 문자열 정형화를 해주는 printf()만 알면 된다.
•
문자열 형식화 양식
문자기반 스트림
•
문자데이터를 다루는데 사용된다는 점을 제외하고는 바이트기반 스트림과 차이가 없다.
•
Reader와 Writer를 사용해서 입출력을 하며 byte배열 대신 char 배열을 사용한다.

Reader의 메서드
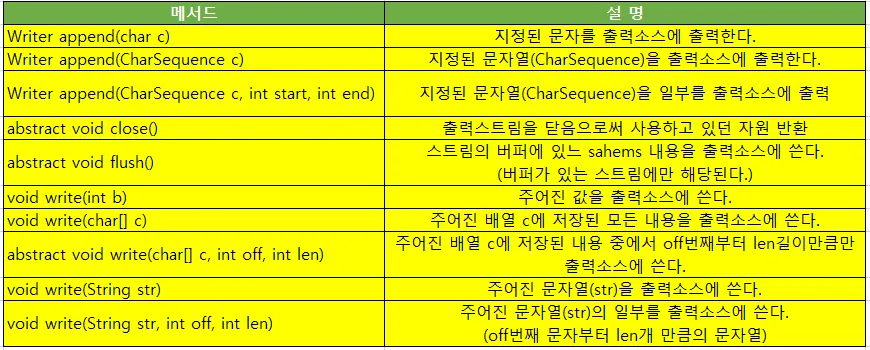
Writer의 메서드
문자기반 스트림과 바이트기반 스트림은 그럼 단순히 바이트가 아닌 문자(2byte)로 스트림을 처리한다는 차이밖에 없을까? 그렇지않다 추가적으로 문자 데이터를 다루기 위해서는 인코딩(encoding)이 필요하다.
문자기반 스트림은 기본적으로 유니코드(UTF-16)간의 변환을 자동처리해준다.
문자기반 스트림 종류
1. FileReader와 FileWriter
•
파일로부터 텍스트 데이터를 읽고 쓰는데 사용되는 스트림
•
사용 방법은 FileInputStream/ FileOutputStream과 거의 유사하다.
try(final FileReader reader = new FileReader(PATH + "file1.txt");
final FileInputStream fis = new FileInputStream(PATH+"file1.txt")){
int data = 0;
while ((data = reader.read()) != -1) {
System.out.print((char)data);
}
while ((data = fis.read()) != -1) {
System.out.print((char)data);
}
}catch(IOException ie){
}
Java
복사
⇒ 위 코드에서는 FileReader와 FileIntputStream을 둘 다 사용해서 같은 파일을 읽은 뒤 출력한다.
⇒ 실행결과를 보면 두 스트림의 차이점을 알 수 있다.
•
실행 결과
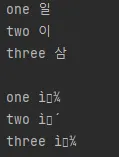
FileInputStream으로 읽어 출력했을 경우 한글은 깨져서 나오는것을 볼 수 있다. 유니코드(UTF-16)간 변환을 자동으로 처리해주지 못하게 때문이다.
2. PipedReader, PipedWriter
•
프로세스(쓰레드)간의 통신(데이터 송/수신)에 사용된다.
•
입력과 출력 스트림을 하나의 스트림으로 연결(connect)해서 데이터를 주고받는다.
•
입출력 후에 한 쪽 스트림만 닫아도 나머지 스트림은 자동으로 닫힌다.
public class App {
public static void main(String[] args) {
InputThread input = new InputThread("Input");
OutputThread output = new OutputThread("Output");
output.connect(input.getInput());
input.start();
output.start();
}
}
public class InputThread extends Thread {
private PipedReader reader;
private StringWriter sw;
public InputThread(String name) {
super(name);
reader = new PipedReader();
sw = new StringWriter();
}
@Override
public void run() {
int data;
try{
while ((data = reader.read()) != -1) {
sw.write(data);
}
System.out.println(getName() + " received : " + sw);
}catch(IOException ie){
ie.printStackTrace();
}
}
public PipedReader getInput() {
return reader;
}
public void connect(PipedWriter output) {
try {
reader.connect(output);
} catch (IOException ie) {
}
}
}
public class OutputThread extends Thread {
private PipedWriter output;
private final Scanner scanner;
public OutputThread(String name) {
super(name);
output = new PipedWriter();
scanner = new Scanner(System.in);
}
@Override
public void run() {
try {
loopSendMessage();
output.close();
} catch (IOException ie) {
ie.printStackTrace();
}
}
private void loopSendMessage() throws IOException {
String msg;
System.out.print("input Message: ");
msg = scanner.nextLine();
System.out.println(getName() + " sent: " + msg);
output.write(msg);
}
public PipedWriter getOutput() {
return output;
}
public void connect(PipedReader input) {
try {
output.connect(input);
} catch (IOException ie) {
}
}
}
Java
복사
⇒ 쓰레드간에 상태나 값을 전달하기에 적절하다.
⇒ 단순히 두 입출력 클래스만가지고 채팅프로그램을 만들기에는 고려할 점이 많다.
3.StringReader와 StringWriter
•
CharArrayReader, CharArrayWriter와 같이 메모리의 입출력에 사용한다.
•
StringWriter에 출력되는 데이터는 내부의 StringBuffer에 저장된다.
•
다음과 같은 메서드를 사용해서 데이터를 얻을 수 있다.
StringBuffer getBuffer() //StringWriter에 출력한 데이터가 저장된 StringBuffer 반환
String toString() //StringWriter에 출력된(StringBuffer에 저장된)문자열을 반환
Java
복사
final Scanner scanner = new Scanner(System.in);
System.out.print("input string:");
final String string = scanner.nextLine();
try (final StringReader reader = new StringReader(string);
final StringWriter writer = new StringWriter()) {
int data;
while ((data = reader.read()) != -1) {
writer.write(data);
}
System.out.println("Input Data: " + string);
System.out.println("Output Data: " + writer.toString());
System.out.println("Output Data: " + writer.getBuffer().toString());
} catch (IOException ie) {
ie.printStackTrace();
}
Java
복사
문자기반의 보조스트림
•
문자기반 스트림의 기능을 추가,확장,보완해주는 보조스트림
1. BufferedReader, BufferedWriter
•
바이트가 아닌 버퍼(char[])단위를 사용하는 보조스트림
•
라인(line)단위의 입출력이 편해진다.
String readLine() //한 라인을 읽어온다(BufferedReader 메서드)
void newLine() //라인 구분자(개행문자)를 출력한다. (BufferedWriter 메서드)
Java
복사
try (final FileReader fr = new FileReader(PATH + "InputThread.java");
final BufferedReader reader = new BufferedReader(fr)) {
String line = "";
for (int i = 1; (line = reader.readLine()) != null; i++) {
System.out.println(i + "\t:" + line);
}
} catch (IOException ie) {
}
Java
복사
2. InputStreamReader, OutputStreamWriter
•
바이트기반 스트림을 문자기반 스트림으로 연결시켜주는 역할을 하는 보조스트림
•
바이트기반 스트림 데이터를 지정된 인코딩 문자데이터 변환작업을 수행한다.
•
sun.jnu.encoding의 값으로 현재 OS에서 사용하는 인코딩의 종류 확인이 가능하다.
⇒ System.getProperties().get("sun.jnu.encoding"))

InputStreamReader 생성자 및 메서드

OutputStreamWriter 생성자 및 메서드
•
사용 예
try (final InputStreamReader isr = new InputStreamReader(System.in);
final BufferedReader reader = new BufferedReader(isr)) {
String line;
System.out.println("Current used OS Encoding : "+isr.getEncoding());
do {
System.out.print("Input Message(exit: 'q'): ");
line = reader.readLine();
System.out.println("result: "+ line);
} while(!line.equalsIgnoreCase("q"));
} catch (IOException ie) {}
Java
복사
⇒ JDK1.5부터는 Scanner가 추가되어 이렇게 사용하지 않아도 된다.
표준입출력과 File
표준입출력 - System.in, System.out, System.err
•
콘솔을 통한 데이터의 입출력을 표준 입출력이라 한다.
•
JVM이 시작되면서 자동적으로 생성되는 스트림이다.
System.in //콘솔로부터 데이터를 입력받는데 사용한다.
System.out //콘솔로 데이터를 출력하는데 사용한다.
System.err //콘솔로 데이터를 출력하는데 사용한다.
Java
복사
•
버퍼를 이용하는 BufferedInputStream, BufferedOutputStream 인스턴스를 사용한다.
•
사용 예제
try {
int input = 0;
while ((input = System.in.read()) != -1) {
if((char)input == 'q') return;
System.out.println("input: " + input + ", (char)input: " + (char) input);
}
} catch (IOException e) {
System.err.println(e.getMessage());
}
Java
복사
•
Scanner와 Console이 나오면서 부족한 콘솔 기능이 많이 보완되었다.
표준입출력 대상 변경 - setOut(), setErr(), setIn()
•
입출력 대상을 콘솔화면에서 다른 대상으로 변경할 수도 있다.
•
static void setOut(PrintStream out)
: System.out의 출력을 지정된 PrintStream으로 변경한다.
•
static void setErr(PrintStream err)
: System.err의 출력을 지정한 PrintStream으로 변경한다.
•
static void setIn(InputStream in)
:System.in의 입력을 지정한 InputStream으로 변경한다.
try {
final FileOutputStream fos = new FileOutputStream(PATH + "test.txt");
final PrintStream ps = new PrintStream(fos);
System.setOut(ps);
} catch (IOException e) {
System.err.println(e.getMessage());
}
System.out.println("Changed System.out.printstream");
System.err.println("Changed System.err.printstream");
Java
복사
⇒ 이 경우에 try-with-resources를 사용하면 자동으로 자원회수(close)되기 때문에 주의필요.
⇒ setErr이나 setIn도 모두 사용법은 동일하기에 추가적인 코드는 생략한다.
RandomAccessFile
•
하나의 스트림으로 파일에 입력과 출력을 모두 수행할 수 있는 스트림
•
다른 스트림과 달리 Object의 자손이다.
•
다른 입출력 클래스와 다르게 읽기/쓰기에 제한이 없다.
•
내부적으로 파일 포인터를 가지고있고 이를 사용해서 입출력시 위치 핸들링이 가능하다.
⇒ 사실 다른 모든 입출력도 내부적으로는 다음 작업이 이뤄질 포인터를 저장하고 있지만, 내부적으로만 사용되기에 핸들링할 수 없다.
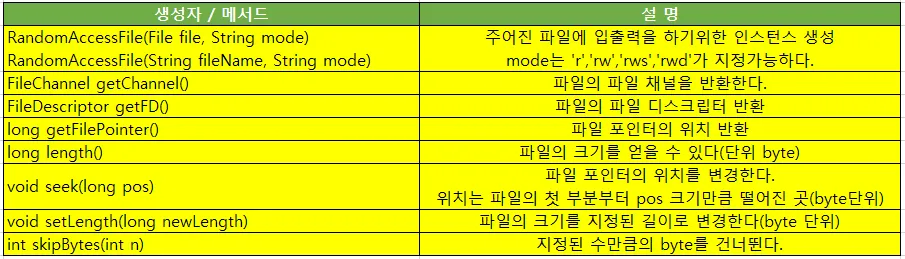
RandomAccessFile의 생성자및 메서드
⇒ 입출력 모드 r, rw, rws, rwd
•
r : 파일로부터 읽기(read)만을 수행할 때
•
rw: 파일에 읽기(read)와 쓰기(write)를 수행할 때
•
rws: 출력내용이 파일에 지연없이 바로 쓰이게한다. (rw와 유사) 파일의 메타정보도 포함
•
rwd: 출력내용이 파일에 지연없이 바로 쓰이게한다. 파일 내용만 작성된다.
⇒ rw모드일 때 지정된 파일이 없으면 새로운 파일을 생성해준다.
•
사용 예제
try(final RandomAccessFile raf = new RandomAccessFile(PATH + "outFile.txt", "rw")) {
System.out.println("파일 포인터 위치: "+ raf.getFilePointer()); // 0
raf.writeInt(100);
System.out.println("파일 포인터 위치: "+ raf.getFilePointer()); // 4
raf.writeLong(100L);
System.out.println("파일 포인터 위치: "+ raf.getFilePointer()); // 12
} catch (IOException e) {
System.err.println(e.getMessage());
}
Java
복사
⇒ int는 4byte이기에 writeInt로 100을 작성한 다음에는 파일 포인터는 4이다.
⇒ long은 8byte이기에 writeLong이후 파일 포인터는 12가 된다.
•
주의점
: 위와같이 writeXxx로 데이터를 작성하는 게 문제없이 성공했고 다음에 바로 해당 파일을 읽으려고 할때 그냥 단순히 읽기를 시도하면 제대로 읽지 못할 수 있다. 다음 코드를 보자.
try(final RandomAccessFile raf = new RandomAccessFile(PATH + "outFile.txt", "rw")) {
System.out.println("파일 포인터 위치: "+ raf.getFilePointer());
raf.writeInt(100);
System.out.println("파일 포인터 위치: "+ raf.getFilePointer());
raf.writeLong(100L);
System.out.println("파일 포인터 위치: "+ raf.getFilePointer());
while (true) {
System.out.println(raf.readInt());
}
} catch (IOException e) {
System.err.println(e.getMessage());
}
Java
복사
⇒ 실행결과는 null이 나올 것이다. 그 이유는 현재 파일 포인터의 위치가 파일 마지막이기때문이다. 그래서 이 파일을 처음부터 제대로 읽고싶다면 seek(long pos)메서드를 이용해 파일 포인터를 다시 처음으로 이동시킨 다음 호출하도록 해야 한다.
File
•
파일과 디렉토리를 다루는 클래스

File클래스의 생성자 및 메서드

File의 경로,이름 구분자 멤버변수
•
OS마다 사용하는 경로 구분자가 다르기에 구분자를 코드에 직접 하드코딩으로 작성한다면, OS가 달라지는 경우 문제가 발생할 수 있다.
•
절대 경로(absolute path)는 파일 시스템의 루트(root)부터 시작하는 파일의 전체 경로를 의미한다.
•
인스턴스 생성만으로 파일(혹은 디렉토리)이 생성되는것은 아니다 createNewFile()메서드를 명시적으로 호출해줘야 생성된다.
File 사용 메서드
•
사용 예제
◦
FileUtils - 디렉토리 경로 조회 및 파일 복사(이름변경) 기능 유틸리티 클래스
package file;
import java.io.*;
public class FileUtils {
private static final StringBuilder sb = new StringBuilder();
public static final String EMPTY_STRING = "";
public static final int INIT_DEPTH = 1;
public static final int ZERO = 0;
public static final String CRLF = "\r\n";
public static String structureFromPath(String path) {
final File file = new File(path);
clearString();
appendFileNameWithRecursive(INIT_DEPTH, file);
return sb.toString();
}
private static void clearString() {
sb.replace(ZERO, sb.length(), EMPTY_STRING);
}
private static void appendFileNameWithRecursive(int depth, File file) {
if (file.isDirectory()) {
sb.append(createDepthMark(depth))
.append("[").append(file.getName()).append("]")
.append(System.lineSeparator());
final File[] files = file.listFiles();
assert files != null;
depth++;
for (File item : files) {
appendFileNameWithRecursive(depth, item);
}
}
if (file.isFile()) {
sb.append(createDepthMark(depth))
.append(file.getName())
.append(System.lineSeparator());
}
}
private static String createDepthMark(int depth) {
return "├" + "──".repeat(depth);
}
public static void copy(String sourcePath, String targetPath) {
final File sourceFile = new File(sourcePath);
validateFile(sourceFile);
clearString();
try (final FileReader fr = new FileReader(sourceFile);
final BufferedReader reader = new BufferedReader(fr);
final FileWriter writer = new FileWriter(targetPath)) {
String data;
String replaced;
while ((data = reader.readLine()) != null) {
replaced = data.replaceAll(pickTargetName(sourcePath), pickTargetName(targetPath));
writer.write(replaced+ CRLF);
}
} catch (IOException ie) {
ie.printStackTrace();
}
}
private static String pickTargetName(String path) {
return path.substring(path.lastIndexOf("/") + 1, path.lastIndexOf("."));
}
private static void validateFile(File sourceFile) {
if (!sourceFile.exists() || !sourceFile.isFile()) {
throw new RuntimeException("유효하지 않은 파일입니다.");
}
}
}
Java
복사
직렬화(Serialization)
•
객체를 네트워크를 통해 컴퓨터간에 주고받기 위해 사용하는 기능
•
객체를 데이터 스트림으로 만드는 것.
⇒ 객체에 저장된 데이터를 스트림에 쓰기(write)위해 연속적인(serial)데이터로 변환하는 것
•
반대로 스트림으로부터 데이터를 읽어 객체를 만드는 것을 역직렬화(deserialization)이라 한다.
•
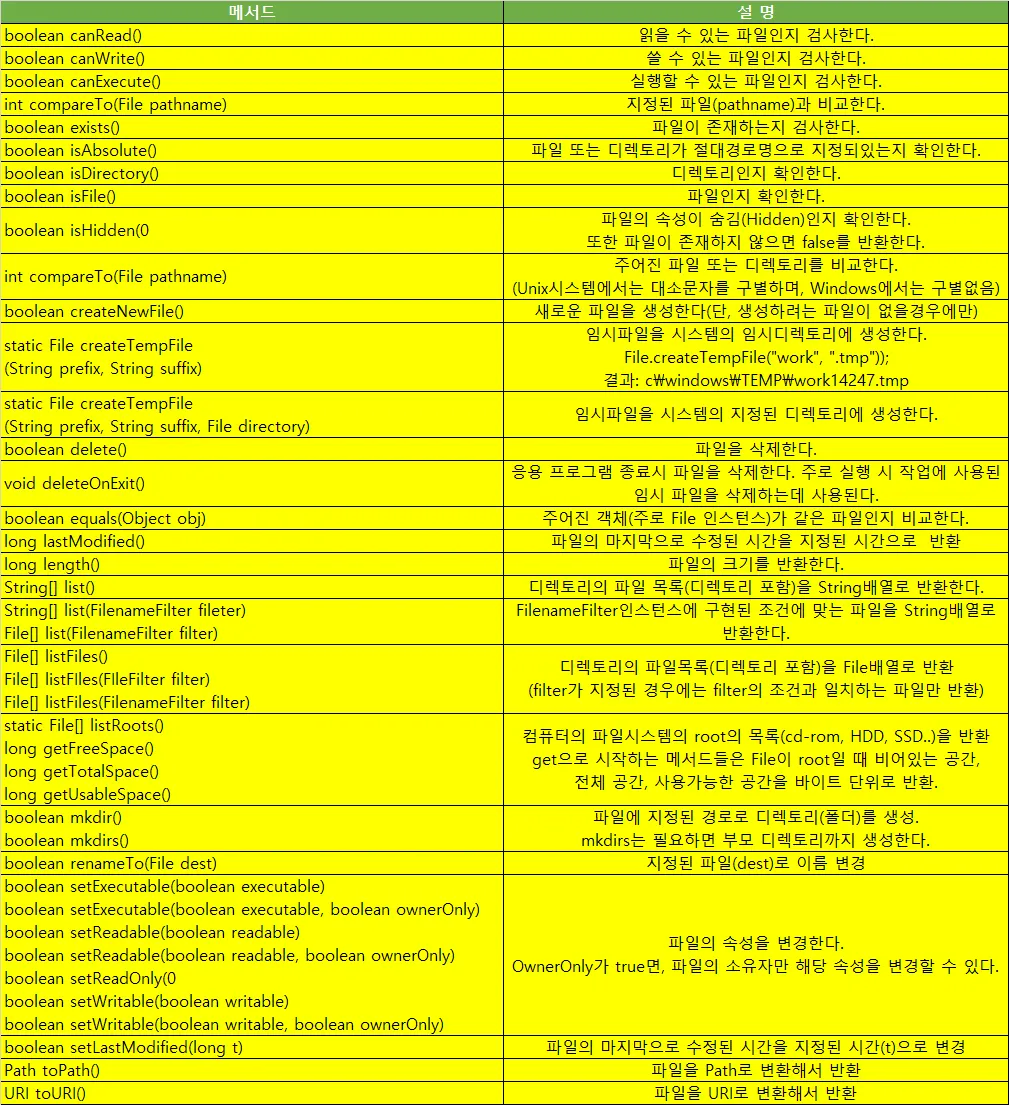
객체는 인스턴스 변수의 집합이다. (클래스변수 및 메서드가 포함되지 않는다. )
⇒ 인스턴스 변수는 인스턴스별로 다르게 저장되지만 클래스 변수와 메서드는 변하는 것이 아니기 때문이다.
TV클래스의 인스턴스 메모리 구조
•
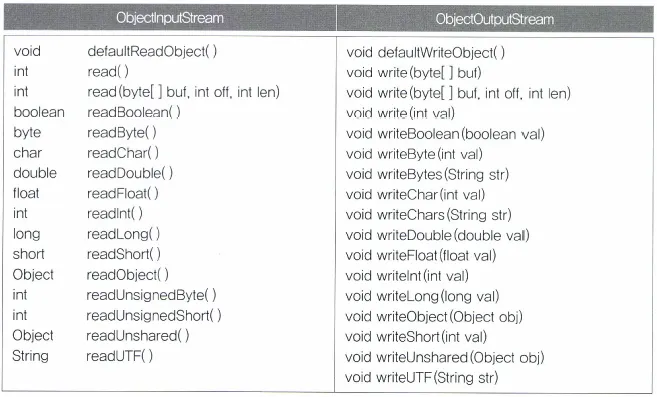
객체를 직렬화/역직렬화 할 수 있는 ObjectInputStream, ObjectOutputStream 사용법만 익히면 된다.
ObjectInputStream, ObjectOutputStream
•
기반스트림을 필요로 하는 보조스트림이다.
⇒ 직렬화 사용법
FileOutputStrema fos = new FileOutputStream("objectfile.ser");
ObjectOutputStrema out = new ObjectOutputStream(fos);
out.writeObject(new UserInfo());
Java
복사
objectfile.ser이라는 파일에 UserInfo객체를 직렬화하여 저장하는 코드
⇒ 역직렬화 사용법
FileInputStream fis = new FileInputStream("objectfile.ser");
ObjectInputStream in = new ObjectInputStream(fis);
UserInfo info = (UserInfo)in.readObject();
Java
복사
objectfile.ser이라는 파일에 저장된 스트림 데이터를 읽어와 객체로 읽는 코드
•
Object외에도 다양한 타입을 읽고 쓸 수 있는 메서드를 제공한다.
•
직렬화 방법은 defaultXxxxObject()메서드를 이용하면 자동 직렬화를 수행한다.
⇒ 객체의 모든 인스턴스 변수가 참조하고 있는 모든 객체에 대한 것이기에 속도가 매우 느리고 복잡하다.
•
readObject(), writeObject()메서드를 직접 구현해서 성능을 높힐 수 있다.
Serializable, transient
Serializable인터페이스는 JVM에게 이 클래스가 직렬화 할 수 있다는 것을 알려준다.
•
따로 구현해야 할 메소드가 없는 명시용 마크 인터페이스다.
•
직렬화가 가능한 클래스를 만들기 위해선 java.io.Serializable 인터페이스를 구현해야 한다.
public class UserInfo implements java.io.Serializable {
String name;
String password;
int age;
}
Java
복사
•
상위 클래스에서 Serializable인터페이스를 구현했다면, 하위 클래스에서는 따로 구현하지 않아도 된다.
•
직렬화 대상에서 제외하고자 할 때는 transient 키워드를 붙혀주면 된다.
public class UserInfo implements java.io.Serializable {
String name;
transient String password;
int age;
transient Object obj = new Object();
}
Java
복사
⇒ password와 obj는 직렬화 대상에서 제외된다.
⇒ 직렬화 대상에서 제외된 필드는 역직렬화시 참조타입은 Null, 기본타입은 기본값으로 설정된다.
•
여러 객체를 직렬화 해야할 경우 콜렉션(ex: ArrayList)클래스를 쓰면 순서를 신경쓰지 않아도 되기에 편리하다.
⇒ 그게아니라면 직렬화, 역직렬화시 매번 순서를 엄격히 지켜야 에러가 발생하지 않는다.
•
직렬화 할 대상이 객체일 경우 해당 객체가 직렬화가 가능하지 않은경우 java.io.NotSerializableException 예외가 발생한다. (transient 키워드 사용하자.)
⇒ 참조타입이 Object일지라도 실제 바라보는 대상이 직렬화 가능 객체일 경우엔 문제없다.
상속관계일때 부모객체의 인스턴스 변수는 어떻게 직렬화를 해야할까?
: 직렬화되지 않는 조상 객체로부터 상속받은 하위 클래스가 직렬화를 구현한다고 선언한경우, 상위 클래스에 선언된 인스턴스 변수는 어떻게 될까? 따로 코드를 작성하지 않는다면, transient를 작성한 필드와 같이 무시된다. 그렇기에 상위 클래스의 인스턴스변수도 직렬화 대상으로 포함시키고자 한다면, 명시적으로 readObject(), writeObject()메서드를 구현해줘야 한다.
•
예제 코드
◦
Point - 직렬화를 구현하지 않은 상위 클래스
package serialization;
public class Point {
private int x;
private int y;
public Point() {
this(9,9);
}
public Point(int x, int y) {
this.x = x;
this.y = y;
}
...
}
Java
복사
•
ColorPoint - 직렬화를 구현한 하위 클래스
package serialization;
import java.io.*;
public class ColorPoint extends Point implements Serializable {
private String color;
public ColorPoint(int x, int y, String color) {
super(x, y);
this.color = color;
}
@Serial
private void writeObject(ObjectOutputStream out) throws IOException {
out.writeInt(super.getX());
out.writeInt(super.getY());
out.defaultWriteObject();
}
@Serial
private void readObject(ObjectInputStream in) throws IOException, ClassNotFoundException {
super.setX(in.readInt());
super.setY(in.readInt());
in.defaultReadObject();
}
...
}
Java
복사
•
PointApplication - 실제 실행 코드
try(final FileOutputStream fos = new FileOutputStream("./example/src/serialization/pointSerial.ser");
final ObjectOutputStream oos = new ObjectOutputStream(fos);
final FileInputStream fis = new FileInputStream("./example/src/serialization/pointSerial.ser");
final ObjectInputStream ois = new ObjectInputStream(fis)){
final ColorPoint bluePoint = new ColorPoint(0, 1, "blue");
oos.writeObject(bluePoint);
final ColorPoint colorPoint = (ColorPoint) ois.readObject();
System.out.println("colorPoint = " + colorPoint);
}catch(IOException | ClassNotFoundException ie){
ie.printStackTrace();
}
Java
복사
•
실행 결과

직렬화 가능한 클래스의 버전관리
•
serialVersionUID - 클래스 버전관리
◦
직렬화 수행 시 클래스 정보를 가지고 해시를 이용해 자동으로 생성되는 클래스의 버전 값
◦
역직렬화 수행 시 해당 값이 동일해야 한다.
◦
동일하지 않을 경우 InvalidClassException 예외가 발생한다.
자동생성 직렬화/역직렬화의 문제
•
객체의 타입변경이나 내용변경에 취약해지며 예외 발생확률이 증가한다.
package serialization;
import java.io.*;
import java.util.Base64;
public class SerializationApplication {
public static void main(String[] args) {
try(final ByteArrayOutputStream bos = new ByteArrayOutputStream();
final ObjectOutputStream oos = new ObjectOutputStream(bos)){
final UserInfo catsbi = new UserInfo("catsbi", "1234", 11);
oos.writeObject(catsbi);
final byte[] serializedInfo = bos.toByteArray();
String str = Base64.getEncoder().encodeToString(serializedInfo);
System.out.println("serializedInfo = " + str);
final byte[] tempSerializedInfo = {-84, -19, 0, 5, 115, 114, 0, 22, 115, 101, 114, 105, 97, 108, 105, 122, 97, 116, 105, 111, 110, 46, 85, 115, 101, 114, 73, 110, 102, 111, 16, -110, -119, 86, 98, -115, -126, 119, 2, 0, 2, 73, 0, 3, 97, 103, 101, 76, 0, 4, 110, 97, 109, 101, 116, 0, 18, 76, 106, 97, 118, 97, 47, 108, 97, 110, 103, 47, 83, 116, 114, 105, 110, 103, 59, 120, 112, 0, 0, 0, 11, 116, 0, 6, 99, 97, 116, 115, 98, 105};
final ByteArrayInputStream bis = new ByteArrayInputStream(tempSerializedInfo);
final ObjectInputStream ois = new ObjectInputStream(bis);
final UserInfo userInfo = (UserInfo) ois.readObject();
System.out.println("userInfo = " + userInfo);
}catch(IOException | ClassNotFoundException ie){
ie.printStackTrace();
}
}
}
Java
복사
•
실행 결과

클래스의 직렬화 버전관리를 위해서 자동으로 생성되는 버전관리 아이디(serialVersionUID)가 있는데 , 이 UID를 자동으로 생성하게 하면 이처럼 객체가 달라질 때 직렬화 아이디가 달라지기에 예외가 발생한다.
대안책
매번 생성되는 SUID가 문제라면 매번 생성되지 않도록 해주면 됩니다.
public class UserInfo implements Serializable {
static final long serialVersionUID = 1L;
private String name;
transient private String password;
private int age;
transient private Object obj = new Object();
...
}
Java
복사
위와같이 SUID를 명시적으로 선언해서 클래스의 버전관리를 수동으로 해주게되면 실행시간에 SUID를 만드는데 걸리는 계산 비용을 줄일 수 있다. 하지만, 클린코드의 주석부분에도 나와있지만, 이렇게 명시적으로 작성해야 하는 코드는 개발자가 조금이라도 신경을 못쓰게되면 바로 예외가 발생할 수 있다.
그렇기에 항시 역직렬화가 실패하는 케이스에 대한 예외처리는 동반되는것이 좋다.
명시적 SUID 선언이 온전한 해결책은 아니다.
SUID를 명시적으로 작성해서 개발자가 직접 클래스 버전관리를 하게되면서 타입추가에 대한 문제가 해결되었고, 클래스 변경에 대한 버전을 바로 확인할 수 있다. 하지만, 이렇게 명시적인 SUID를 선언해주더라도 문제가 발생할 수 있다.
•
멤버 변수명은 같지만 멤버변수 타입이 바뀔때
public class UserInfo implements Serializable {
static final long serialVersionUID = 1L;
private String name;
transient private String password;
//private int age;
private long age;
transient private Object obj = new Object();
...
}
Java
복사

필드 타입중 age의 타입을int→ long 으로 변경하니 예외가 발생한다.
멤버 변수의 추가 혹은 삭제에는 기본값 매핑정책으로 문제가 발생하지 않지만 기존 변수의 타입 변경에는 엄격하게 평가하여 예외가 발생한다.
주의점
•
외부(DB, 캐시 서버, NoSQL서버 등)에 장기간 저장될 정보는 자바 직렬화 사용을 지양해야 한다.
역직렬화 대상 클래스가 언제 변경될지 모르는 환경에서 긴 시간동안 외부에 존재했던 직렬화된 데이터는 유효하지 않을 확률이 높다. 그리고 이런 데이터를 역직렬화 시도할 때는 언제 터질지 모르는 오류의 원인이 된다.
•
개발자가 직접 컨트롤 할 수 없는 클래스의 객체는 직렬화를 지양해야 한다.
억지로 직접 변경해서 할 수도 있지만 일반적으로 개발자가 직접 컨트롤이 힘든 객체들을 편의목적으로 직렬화 시켜서 DB또는 캐시서버에 바로 저장하면 차후 프레임워크나 라이브러리가 버전업을 하면서 SUID가 변경될 경우 개발자측에서 감지를 못한다면 오류가 발생할 것이다.
(ex: 스프링 시큐리티의 SecurityContextImpl 클래스는 SUID가 스프링 시큐리티의 버전 값이기에 버전이 바뀔때마다 개발자가 신경을 써 줘야 한다.)